Cleric
Updated Nov 7, 2026
The Cleric is a healer who keeps their damage up: the macro runs Debilitating Mark, Chain of Torment, Earth Punishment, Condemnation and Judgment Thunder, and you heal to need on your own keys. Dungeon rewards depend on contribution, so a Cleric who only heals earns less. Push Condemnation, Radiant Recovery and Healing Light first and put your skill lines on your rings. Data: about 9,000 top Korean Clerics (AION2CAL, Oct 10), the global client's tooltips (build 0.0.4387.0), global guides dated Oct 6–10 and Korea's official notes through Oct 14.
At a glance
- Heal to need, damage in between. Attack also powers your heals (Healing Enhancement turns Attack into Heal Boost), so gear Attack, not Defense.
- Condemnation is your damage and needs Chain of Torment on the target. Earth Punishment makes it crit; its rank 12 option resets its 3 s cooldown on a crit.
- Priority: Condemnation, Radiant Recovery and Healing Light first; then Bolt, Judgment Thunder, Divine Aura, Earth's Retribution, Light of Regeneration. Chain of Torment and Debilitating Mark stop at 12–14.
- Skill points stop at rank 10. Daevanion adds +4 (14 total); rank 16 needs ring lines and Arcana too.
- Stigmas: Earth Punishment, Light of Protection, Noble Aura, Prayer of Amplification. With a Chanter, swap Light of Protection for Absolution or Benevolence.
- Macro: Debilitating Mark, Chain of Torment, Earth Punishment, Condemnation, Judgment Thunder, with Earth's Retribution held on left mouse.
- Heals, Bolt, auras and toggles stay on your own keys. Light of Protection is a toggle; never macro it.
- Passives: Empyrean Lord's Grace, Earth's Grace, Healing Enhancement, Radiant Benediction.
- Gear: Weapon Damage Boost, Might, Combat Speed and Precision on mace and guard; Condemnation, Radiant Recovery and Bolt lines on rings.
- Spend what is closest to its cap first: Shugo keys (3 a day, cap 12) and Odyle Energy.
- Use only the game's built-in macro. Mouse macros and third-party tools get accounts banned.
Where the Cleric stands
- Damage (Korean meter, Oct 11): median 565K for all players (9th of 9), 650K at 400K+ combat power (9th), 863K at 600K+ (9th, against 1.52M for the Brawler). That is by design; global guides rate it S in PvE because every dungeon wants one.
- Role: the dedicated healer, with resurrection, cleanse and party buffs through stigmas. Ranged mace caster; slow solo but safe, and the first target in PvP.
- Global standing (Oct 11): shugo.gg rates it S: the main healer with resurrection and cleanses, wanted in every hard dungeon, with low personal damage on the meters. The Korean brackets above use Korean combat power (the top-80 Korean median is about 1.12M against 268K on global), so read them as a ranking.
- Global Combat Power (Nov 7): the global Cleric median is 124K (metabot, Nov 4); groups that gatekeep on CP usually exempt Clerics.
- Battlefield Might (Korea, Sep 23): replaces Experienced Counterstrike, Undefeated Mantra, Light of Protection, Power of the Storm and Earth's Blessing in Abyss boss fights, Rift Zone and Rift Domination. Global timing is unknown.
- Why damage matters: rewards depend on contribution, so healers who keep up damage level faster and drop more.
Current patch: what has changed
Global: the Oct 5 launch, Oct 6–7 and Oct 14 patches list no Cleric changes. The global client matches Korea's Sep 16 state. Korea's Oct 7 patch raised skill presets from 3 to 5; global timing is unknown. The Oct 21 patch (Oct 20 PDT) lists no Cleric changes. It added Krao Cave and Draupnir on Hard (2,600 item level) and a new Ariel Daevanion board (see Gear score milestones), raised the Abyss player cap and Abyss boss HP, and fixed title effects that didn't match their tooltips. The Oct 28 patch (Oct 27 PDT) raised the Cleric's base HP at 45 from 4,702 to 5,702, cut boss Attack and HP in Expedition and Transcendence, added Urugugu Canyon and Vakron Sky Island on Hard (2,700) and raised crafted gear's Amplify caps. The Nov 4 patch (Nov 3 PST) opened Abyssal Forge: Ludra, made Draupnir, Vakron and Horn Den Exploration pay like Conquest, added always-succeed True and Star Dragon recipes, pet souls from Expedition and Transcendence, and Chaotic Outer Reshanta (PvP with equalised stats); no class changes.
| Date | Korean change |
|---|---|
| Aug 12 | Heals rebalanced: Radiant Recovery, Healing Light, Light of Regeneration, Absolution, Benevolence and Radiant Benediction radius 25 → 40 m, healing −20–50%, extra heal-over-time options roughly halved. Healing Enhancement's flat bonus removed; it now scales only with Attack. Defiance's HP restore 20% → 10%. |
| Aug 26 | Debilitating Mark's damage reduction option 5% → 10%. Earth Punishment's party effects: 10% for you and 5% for the party (was 7%). Earth's Grace Crit Damage doubled (15 / 20 / 25% at ranks 10 / 20 / 30). Prayer of Amplification's Attack option 10% → 15% and damage option 10% → 20%. |
| Sep 4 | The announced PvE damage buff shipped (emergency Class Care maintenance). Bolt: +20% PvE and mobile by default, and its 2nd option is now +300 Accuracy. Prayer of Amplification: cooldown 90 s → 60 s; its 1st option is now +20% PvE and +10% PvP damage amplification (it was a 30 s cooldown cut), and its 5th is now +10% all-element damage amplification. |
| Sep 9 | Salvation bug fix: its 5th option applied the no-stacking invincibility only to the caster and lowest-HP member. |
| Sep 16 | Radiant Recovery's second option changed from +20% skill speed to +1 consecutive use. Judgment Thunder no longer locks other skills under mobile combat support. |
| Sep 23 – Oct 7 | No Cleric changes. |
| Oct 14 | RvR overhaul, mostly PvP: PvP damage about −30%; Assault Mark grants up to +80% Defense and attribute tolerance for 5 s. Lightning Strike Scattershot now deals Wind damage, and Noble Aura and Empyrean Lord's Grace Earth damage. Assault skills also lose their recast-reduction effect. Chanters and Clerics can break the Snowfield of Sorrow "wedge" pattern more easily (no numbers given). |
Level-by-level checklist
Follow the yellow main-story quests to 45; they pay 97–99% of the EXP. Each sealed dungeon clear also gives 2 Daevanion points, 2 skill points, 15,000 Kinah and 1,250 Enhance Stones. Levels 30–39 are slow, so fill the gap with sealed dungeons. Level attack skills before heals; healing-first Clerics level slowly.
The last column is the highest rank you can buy by the end of each band. A skill learned by level 17 gains a rank every 3 levels (rank 8 at unlock level + 18, rank 10 at + 24); skills learned at 21 or later have no gate.
| Levels | Unlocks | Do this | Ranks you can buy |
|---|---|---|---|
| 1–5 | Earth's Retribution, Judgment Thunder, Debilitating Mark, Warm Benediction (1); Divine Aura (3); Chain of Torment (4); Scattershot (5); Lesser Daeva Wings quest (5) | Story only. Use target mode so basic attacks continue. Collect 40 feathers for an amulet upgrade | Earth's Retribution and Judgment Thunder first |
| 6–10 | Empyrean Lords' Benediction (6); Light of Regeneration (7); Condemnation (8); Empyrean Lord's Grace (9); Healing Light (10) | Chain of Torment above Condemnation in the macro. First sealed dungeons | Chain of Torment and Condemnation as they unlock |
| 11–15 | Healing Enhancement (11); Radiant Recovery (12); Nezekan board (12); Immortal Veil (13); Bolt (14); Heal Block (15) | Spend Daevanion points right away. Hideouts at 15. Attack skills before heals | Starters to rank 6; Debilitating Mark, Earth's Retribution, Judgment Thunder rank 8 at 19 |
| 16–20 | Defiance (16); Prayer of Concentration (17); Zikel board (20) | Amulet to +10 around 17, weapon to +10 | First picks at 19: +20% Discharge, +12% vs fewer targets, −15% Defense during DoT |
| 21–25 | Earth's Grace (21), raise it to 8 at once; stigma slot 1 (22); Survival Willpower (23); Radiant Benediction (25) | Slot Earth Punishment. Sealed dungeons. First rune | Chain of Torment 8 at 22; Light of Regeneration 8 at 25; starters 10 at 25 |
| 26–30 | Stigma slot 2 (27); Vaizel board (30); Daily Dungeon (30) | Slot Light of Protection | Condemnation 8 at 26; Empyrean Lord's Grace 8 at 27; Healing Light 8 at 28; Radiant Recovery 8 at 30 |
| 31–35 | Stigma slot 3 (32) | Slot Noble Aura. Raise Healing Light to 16 before group dungeons | Bolt 8 at 32; Condemnation 10 at 32; Healing Light 10 at 34 |
| 36–40 | Stigma slot 4 (37); Triniel board (40) | Slot Prayer of Amplification. Second rune | Radiant Recovery 10 at 36; Bolt 10 at 38 |
| 41–45 | Azphel board (45, PvP); endgame content (45) | Finish Episode and Ascension quests. Craft rings | Daevanion takes Condemnation to 14. Rank 16 needs rings and Arcana |
Leveling extras: don't open the Journal Duty tab before level 45 (a launch bug delays Duty content until the day after you reach 45); clear hideouts at levels 15, 20 and 25; at the cap, do the Shugo activities and a map sweep (level 30 gives a title).
Leveling playbook. Packs: Chain of Torment, Condemnation, Divine Aura (AoE pick), Judgment Thunder. Elites: Debilitating Mark, Chain of Torment, a charged Bolt, Condemnation. Weave Earth's Retribution for MP; Healing Light at low HP; Scattershot on a staggered boss.
After 45, in order:
- Regional quests (accessory and rune slots).
- Every remaining sealed dungeon.
- Strongholds (Noble Belt scrolls).
- Conquest, gated by total item level: Krao Cave and Draupnir at 700, Urugugu Canyon and Vakron Sky Island at 1,400, Fire Temple and Ferocious Horn Den at 2,100. Run the highest you qualify for.
- Transcendence from item level 1,600 (stages to 2,500) for Arcana; see Transcendence dungeons for which one to farm.
- Nightmare (Pantheon fragments) and Abyss (stigma shards, Daevanion resources).
- The Ludra raid (Abyssal Forge: Ludra, open since Nov 4) needs 2,800 item level for Normal and 3,000 for Hard; until then, the top steps are Krao Cave and Draupnir on Hard (2,600) and Urugugu Canyon and Vakron Sky Island on Hard (2,700).
How skills level up (and how to reach 16)
Skill points only buy ranks 1–10 (13 points to rank 8, 21 to rank 10). Everything above comes from the sources below.
| Source | Adds | Note |
|---|---|---|
| Skill points | Ranks 1–10 | About 203 by level 45, +2 per home sealed dungeon, about 384 in total. |
| Character-level gate | Pace | Skills learned by level 17 gain a rank every 3 levels (rank 8 at unlock level + 18, rank 10 at + 24). Skills learned at 21 or later have no gate. |
| Daevanion skill nodes | +1 per board, +4 max | Nezekan, Zikel, Vaizel and Triniel; 3 points per active. |
| Gear skill lines | +1 per line | Weapon, guard and both rings roll active-skill lines; necklace, earrings and armor roll passives; bracelets none. One line per skill per item, up to 4 skill lines per item, so gear can add +4 to one active. Rings are the cheapest place, since weapon and guard lines go to Weapon Damage Boost, Might and Combat Speed. About 20% of rolls are skill lines (Korean odds). |
| Arcana lines | Up to +4 per line | Every card carries skill lines: Chalice (any of 22 skills), Parchment and Compass (6 actives each), Bell and Mirror (5 passives each). A card has 1 to 4 options by grade, each starting at +1, and each enhancement adds +1 to a random one (max +4), so a Chalice plus the matching card can put +8 on one skill; a 1-option Common can beat a Unique for a core skill. |
| Stigma Shards | Stigma ranks | Stigmas level to 20 on global. A rank costs 1, 2, 4 then 8 shards by 5-rank band (5 / 15 / 35 / 75 in total at rank 5 / 10 / 15 / 20). Leveling gives about 29 by level 45, so take each stigma to 5 first, then your main one to 10. |
Daevanion alone reaches 14, never 16. Rank 16 needs two more levels from rings or Arcana. No global skill cap is published (client tables run to 40): the theoretical ceiling for an active is 10 points + 4 Daevanion + 4 gear + 8 Arcana = 26, and the Ariel board adds no ranks. Top global players average 14–17 on their main skills.
Rank 16 adds only part of the damage listed here (the "+% Attack" part doesn't grow). Its real value is the specializations, such as cooldown removal and ignoring Block.
| Skill | Rank 10 | Rank 14 | Rank 16 | Rank 20 |
|---|---|---|---|---|
| Condemnation | 1,624 | 2,010 (+24%) | 2,218 (+37%) | 2,517 (+55%) |
| Radiant Recovery (heal) | 1,153 | 1,497 (+30%) | 1,669 (+45%) | 2,012 (+75%) |
| Healing Light (heal) | 579 | 751 (+30%) | 837 (+45%) | 1,020 (+76%) |
| Bolt | 3,076 | 3,783 (+23%) | 4,039 (+31%) | 4,550 (+48%) |
| Judgment Thunder | 687 | 1,002 (+46%) | 1,103 (+61%) | 1,321 (+92%) |
| Divine Aura | 2,948 | 4,047 (+37%) | 4,513 (+53%) | 5,315 (+80%) |
| Chain of Torment | 1,038 | 1,425 (+37%) | 1,589 (+53%) | 1,871 (+80%) |
Priority:
- Skill nodes for core skills on every board (12 points per active for +4).
- Core skill lines on both rings.
- Chalice and Parchment lines on a core skill short of 16.
- Stop at rank 8 on skills where you only want one specialization.
- Treat 12 and 16 as breakpoints; 13 or 15 isn't worth chasing.
Point budget. Maxing every active and passive to rank 10 costs about 460, so spend in this order (cheap early ranks first, ranks 9–10 last):
| Spend | Points | Running total |
|---|---|---|
| 1. Condemnation, Radiant Recovery and Healing Light to 8 | 39 | 39 |
| 2. Empyrean Lord's Grace, Earth's Grace, Healing Enhancement and Radiant Benediction to 8 | 52 | 91 |
| 3. Bolt, Judgment Thunder and Earth's Retribution to 8 | 39 | 130 |
| 4. Condemnation, Radiant Recovery and Healing Light 8 → 10 | 24 | 154 |
| 5. Light of Regeneration and Divine Aura to 8 | 26 | 180 |
| 6. Chain of Torment and Debilitating Mark to 8 | 26 | 206 |
| 7. Empyrean Lord's Grace 8 → 10 | 8 | 214 |
Rows 1–5 fit inside the 203 points from levels alone; the rest come from sealed-dungeon and regional-quest points.
Active skills
The last column is the share of top Korean Clerics with the skill at that rank.
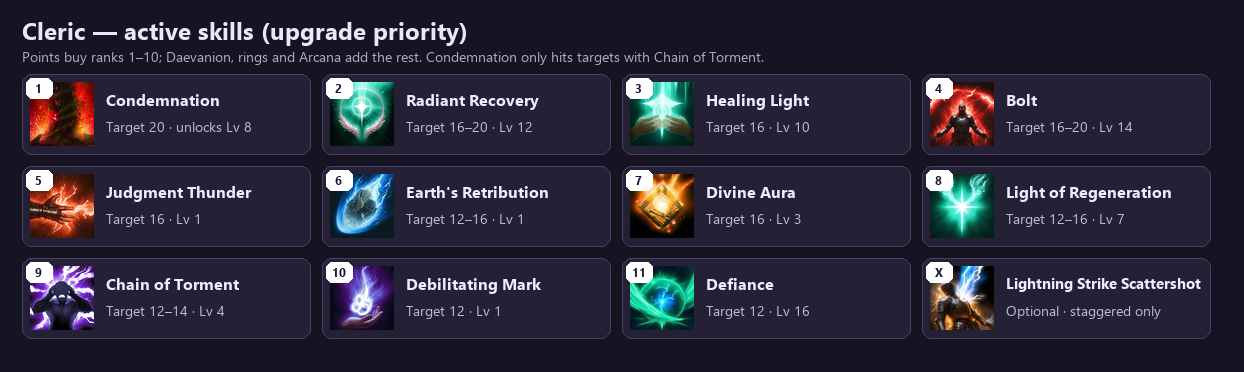
| Priority | Skill | Target | Job | Top players |
|---|---|---|---|---|
| 1 | Condemnation | 20 | Main damage; 3 s cooldown; needs Chain of Torment | 75% at 20 |
| 2 | Radiant Recovery | 16–20 | 12 s party heal; removes a debuff | 78% at 20 |
| 3 | Healing Light | 16 | 6 s; heals you and the lowest-HP member | 92% at 16 |
| 4 | Bolt | 16–20 | 45 s charged burst, 3 levels | 75% at 16 |
| 5 | Judgment Thunder | 16 | AoE filler; triggers Divine Punishment | 90% at 16 |
| 6 | Earth's Retribution | 12–16 | Basic attack; restores MP | 58% at 20 |
| 7 | Divine Aura | 16 | 30 s stationary aura; 20 in 5 of 8 top builds | 75% at 16 |
| 8 | Light of Regeneration | 12–16 | 30 s party heal over time | 91% at 16 |
| 9 | Chain of Torment | 12–14 | DoT; −5% enemy tolerance (−15% with its rank 12 option) | 98% at 12 |
| 10 | Debilitating Mark | 12–14 | DoT; −5% enemy damage (−15% with its rank 12 option) | 98% at 12 |
| 11 | Defiance | 12 | Breaks stuns; fires with Space | 73% at 12 |
| X | Lightning Strike Scattershot | optional | Staggered targets only; 44% of top global Clerics leave it under 8 |
Korean top players take Radiant Recovery and Condemnation to 20 first; take Condemnation first if you level or solo a lot, Radiant Recovery first for dungeons.
Specializations
You have three slots, which open at rank 8, 12 and 20. Each option has its own minimum rank (8, 12 or 16), so at rank 16 you fill two slots from options up to 16.
| Skill | Pick order (minimum rank) | Note |
|---|---|---|
| Condemnation | +12% vs fewer targets (8), resets cooldown on a crit (12), Multi-hit (16) | 100 MP or 20% Root at 8 |
| Radiant Recovery | −3 s cooldown (8), +5% HP (16), +1 charge (8) | "Removes 2 debuffs" (8) for debuff fights |
| Healing Light | +2 consecutive uses (8), +2% HP (12), −2 s cooldown (16) | |
| Bolt | +30% skill speed (8), +20% vs fewer targets (12), Crit on hit (16) | Mobile by default since Sep 4; nobody takes the +300 Accuracy option (spec 2) |
| Judgment Thunder | +12% vs fewer targets (8), extra Divine Punishment (16) | −20% MP at 8 if mana runs dry |
| Earth's Retribution | +20% Discharge chance (8), −7 s Bolt cooldown (12), +50% Multi-hit (8) | |
| Divine Aura | +50% aura speed (8), −10 s cooldown (16), +3 s duration (12) | AoE pick (8) for packs |
| Chain of Torment | +3 s DoT (8), +10% tolerance reduction (12) | |
| Debilitating Mark | −15% target Defense during DoT (8), +10% damage reduction (12) | |
| Light of Regeneration | +20% heal at 50% HP or less (8), +5% PvE tolerance (16) | |
| Defiance | 10% HP (8), +2 s Tenacity (12), +50% PvE tolerance (16) |
Guides number these differently because they count the third slot. Read the tooltip.
Passives
Each rank adds the same amount, but ranks 9–10 cost 4 points each, so take the key passives to 8 first and Empyrean Lord's Grace to 10 later. Target is the rank to buy with points; fillers get ranks 2–4 (1 point each) only if points are spare. Earth's Grace and Empyrean Lord's Grace also roll on about 66% of top Clerics' gear.
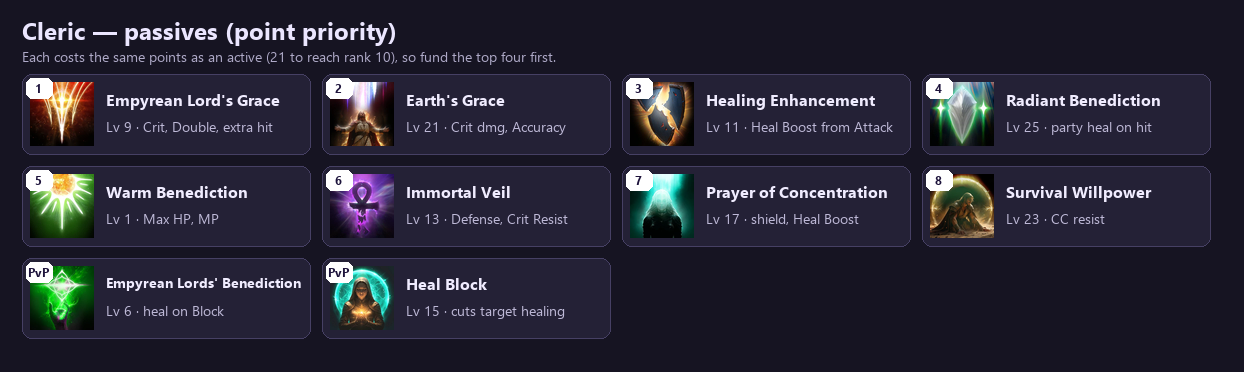
| Rank | Passive | Target | Unlocks | What it gives |
|---|---|---|---|---|
| 1 | Empyrean Lord's Grace | 10 (8 first) | 9 | Crit, Double Chance and bonus damage on every attack |
| 2 | Earth's Grace | 8 | 21 | Crit Damage and +100 Accuracy (flat, from rank 1); doubled on Aug 26. Raise it to 8 the day you learn it |
| 3 | Healing Enhancement | 8 | 11 | Heal Boost from your Attack |
| 4 | Radiant Benediction | 8 | 25 | Party heal whenever you land an attack (5 s cooldown) |
| 5 | Warm Benediction | 4 | 1 | Max HP and MP |
| 6 | Immortal Veil | 4 | 13 | Defense and Crit Resist |
| 7 | Prayer of Concentration, Survival Willpower | 1 | 17, 23 | Shield and heal boost; CC resist |
| PvP | Empyrean Lords' Benediction, Heal Block | skip | 6, 15 | Heal on Block; cuts target healing |
Stigmas
Global has four slots (22, 27, 32, 37) and stigmas level to 20; Korea has five slots (since Mar 25; one seller site reports six after Chapter 1) and goes to 25. Several are party buffs, which is where the Cleric earns its seat.
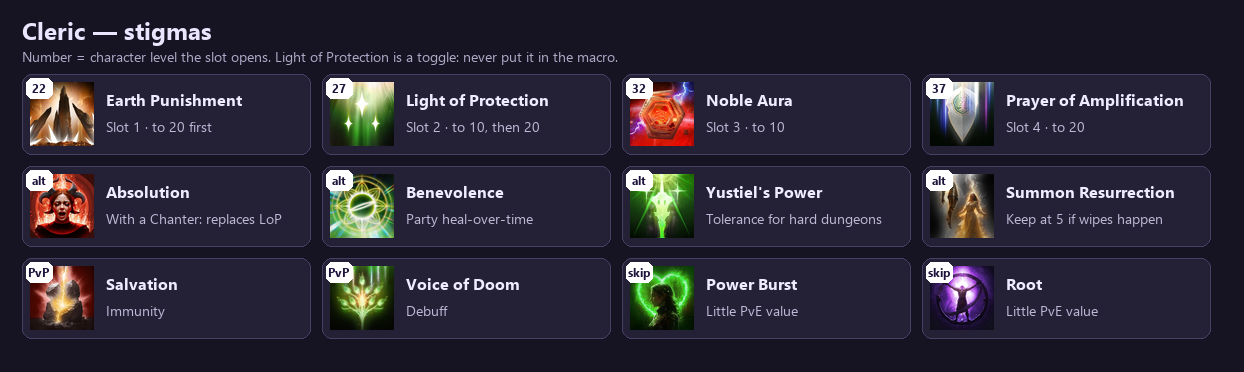
| Slot | Stigma | Target | What it does, and bonuses at ranks 5 / 10 / 15 / 20 |
|---|---|---|---|
| 1 (22) | Earth Punishment | 20 | 30 s DoT; at 5, Condemnation always crits on it. 10: +10% Double Chance for you, +5% party; 15: +10% Attack and Defense, +5% party; 20: +10 s |
| 2 (27) | Light of Protection | 10, then 20 | Toggle. Party PvE damage and tolerance (about 20% at 20). +10% incoming heal / +100 Accuracy / +10% Max HP / +10% Perfect. Doesn't stack with Undefeated Mantra |
| 3 (32) | Noble Aura | 10 | 300 s orb that attacks your target every 2 s. +200 Crit / +20 damage vs Debilitating Mark / +30% vs CC-immune / −1 s |
| 4 (37) | Prayer of Amplification | 20 | +20% Attack, 10 s at rank 1, about 20 s at 20 (60 s cooldown since Sep 4). Options include +20% PvE damage (+10% PvP), ×1.5 Empyrean Lord's Grace, ×1.5 Earth's Grace, +15% Attack and a +10% all-element damage option; Sep 4 reshuffled them, so read the tooltip for the rank order |
- With a Chanter: Light of Protection can be swapped for Absolution (strong party heal from rank 15), Benevolence (party heal over time), Voice of Doom, Summon Resurrection or Yustiel's Power; without a Chanter, keep it.
- New or hard dungeon: Light of Protection, Absolution, Yustiel's Power, Summon Resurrection (keep it at 5 if the party wipes). Benevolence is a party heal over time worth a slot from 15.
- PvP: Salvation, Yustiel's Power, Absolution, Voice of Doom, Root. Skip Power Burst and Assault Mark.
- Upgrade order: Earth Punishment to 15, then 20; Prayer of Amplification and Noble Aura; Light of Protection to 10; endgame builds then take all four to 20.
- Korean rates: at rank 25, Light of Protection 57%, Earth Punishment 45%, Prayer of Amplification 29%, Noble Aura 17%; at 20, Benevolence 79%, Absolution 70%, Yustiel's Power 67%. Global top 1,000 (metabot): Light of Protection 87%, Noble Aura 80%, Earth Punishment 65%, Summon Resurrection 64%. Stigma Shards: Abyss shop (200), Nightmare shop (52,500 fragments for 35), Shugo shop (10,500 tokens for 35).
Rotation and macro
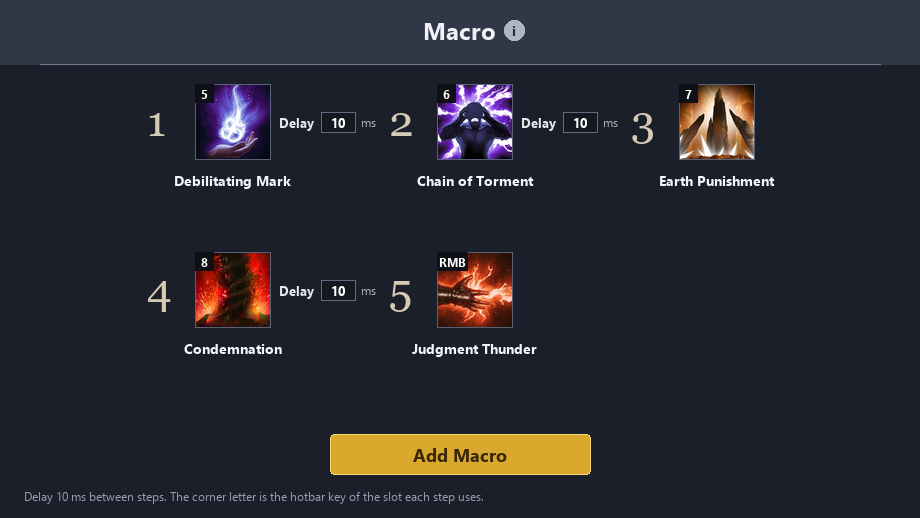
Set up: most-liked community builds now put the macro skills in one or two stacks and run a 1–2 step macro over them, held with left mouse; a macro step presses a whole slot (see Community builds for this class's stacks). The per-slot layout below is the simpler fallback: give every macro skill its own hotbar slot first (see Hotbar setup). Then open the Skill menu (K) → Macros → Add Macro, add the skills in the order shown, and bind the macro key under Settings → Key Settings → General → Gameplay → Macro. Bind it to a side mouse button and hold it together with left mouse, so right mouse keeps the bar's last slot (see Hotbar setup). Use 10 ms between steps (try 40–50 ms if inputs drop). Turn Skill Queue on in Settings → Combat → Controls, off if basic attacks get dropped.
| Step | Skill | Slot | Why here |
|---|---|---|---|
| 1 | Debilitating Mark | 5 | DoT; −15% enemy damage with its rank 12 option |
| 2 | Chain of Torment | 6 | DoT; Condemnation needs it on the target |
| 3 | Earth Punishment | 7 | Makes Condemnation crit; above it so the crit effect is up first |
| 4 | Condemnation | 8 | Main damage; resets on a crit at rank 12 |
| 5 | Judgment Thunder | RMB | AoE filler; triggers Divine Punishment |
| Key | What it does |
|---|---|
| Macro key (a side mouse button) | Runs the five steps above in order; hold it together with left mouse |
| Left mouse (hold) | Earth's Retribution: restores MP on every cast |
| Right mouse | Judgment Thunder, the Cleric's default right-mouse skill; also the macro's last step |
| By hand | Light of Protection (toggle), Light of Regeneration, Healing Light, Radiant Recovery, Absolution, Salvation, Summon Resurrection, Bolt, Divine Aura, Noble Aura, Prayer of Amplification, Scattershot (Defiance fires with Space) |
- The debuffs have cooldowns, so the macro falls through to Condemnation when they aren't ready; at rank 12 Condemnation resets on a crit and fires most presses.
- Keep heals, Bolt and emergency skills out of the macro. Check the Combat Analysis: Condemnation should land about as often as Judgment Thunder.
- Heal order: before predictable damage, Light of Regeneration; several hurt, Radiant Recovery; one in danger, Healing Light; emergency, Absolution; after a death, Summon Resurrection when safe; stable, back to Condemnation. Heal just before a heavy hit, and use small heals for chip damage.
- Burst: Prayer of Amplification, then a charged Bolt at a stagger window. Community stack styles: damage (MrRosaPony: Debilitating Mark, Divine Aura, a Light of Regeneration stack, Chain of Torment ×3, Judgment Thunder), Prayer (Prayer of Amplification ×3, Debilitating Mark) or support (Light of Regeneration with Earth Punishment); heals stay manual.
- Dungeons: Krao Cave (Conquest gate: item level 700): leave lethal mechanics first, then heal. Fire Temple: don't waste MP on avoidable ground damage. Draupnir: save emergency heals for movement phases.
- Use the game's built-in macro only.
Hotbar setup
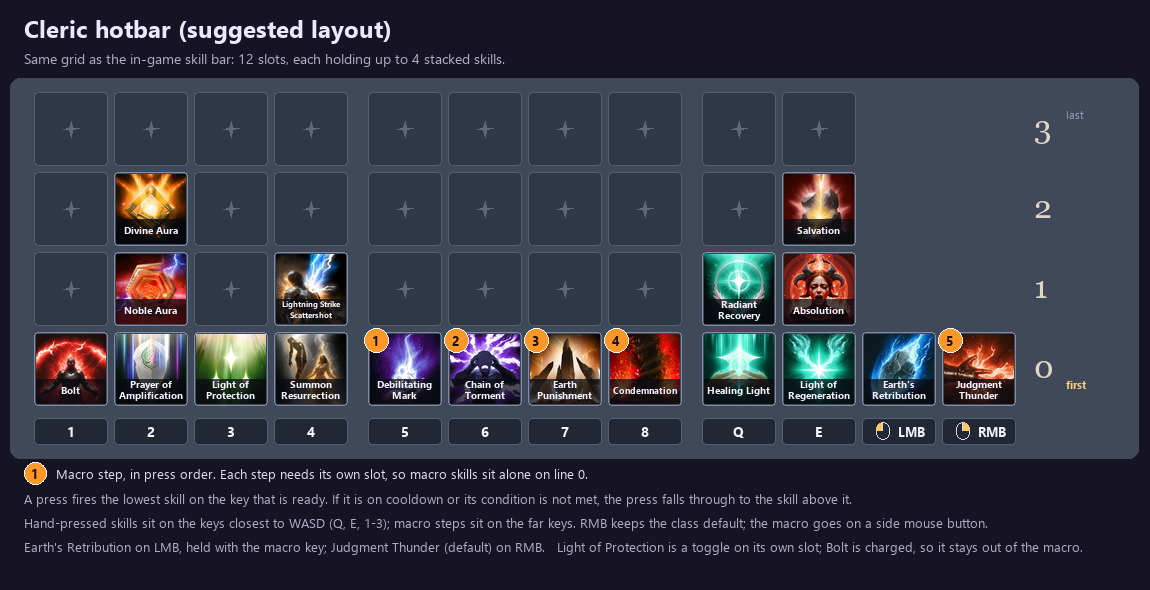
- Left mouse: Earth's Retribution, held together with the macro key. Right mouse (RMB): Judgment Thunder, the Cleric's default right-mouse skill and the macro's last step.
- Heals Q: Healing Light, then Radiant Recovery. E: Light of Regeneration before a big hit, then Absolution and Salvation in an emergency.
- Bolt (1) is charged, so it stays out of the macro. Cooldown key 2: Prayer of Amplification, then Noble Aura, then Divine Aura. Light of Protection (3) is a toggle you set once. 4: Summon Resurrection after a death, then Lightning Strike Scattershot on a staggered boss.
- Macro slots 5–8 and RMB, in step order: Debilitating Mark, Chain of Torment, Earth Punishment, Condemnation, Judgment Thunder.
- Swap-ins: Absolution, Salvation and Summon Resurrection are optional stigmas, so slot them only if equipped; Benevolence and Yustiel's Power need a slot of their own when you equip them.
- Reach: hand-pressed skills take the keys closest to WASD (Q, E, then 1–3) and the macro steps take the far ones, since the macro presses those for you. Put the most time-critical skills (gap closers, blocks, heals) on Q and E.
- Defiance can't be slotted: the stun break fires with Space, so it never needs a bar slot.
- Stacking: a slot holds up to four skills. A press fires the lowest one that is ready; if it is on cooldown or its condition isn't met, it falls to the next one up. Put cooldown and conditional skills at the bottom and spam skills on top.
- Stacks and macros: a macro step presses a whole slot, so a step on a stacked slot fires that stack's first ready skill. Top community builds put the macro skills in one stack (usually right mouse) and hold it with left mouse, or run a 1–3 step macro over stacks; see Community builds, and test it on a dummy.
- Keep out of the macro: toggles (a second press can switch them off), charged skills, and situational or emergency skills.
- Slots: the bar has 12. The last four are Q, E, left mouse (LMB) and right mouse (RMB). Every class starts with its basic attack on LMB and a second skill on RMB (T is RMB's keyboard key). Put the macro on a side mouse button so RMB keeps that skill; binding the macro to right mouse pushes the slot onto T. Rebind slots under Settings → Key Settings → Quickslot, and treat this layout as a suggestion.
Daevanion boards
Buy the blue nodes for Condemnation, Radiant Recovery, Healing Light, Bolt and the rest of your core skills first (that gets you to rank 14), then the orange corners, then the green passives, routing through Attack and Crit greys. Costs: grey 1, green 2, blue 3, orange 4; each node must touch one you own. The Korean route (a different layout) is 110 nodes and 165 points.
| Board (level) | Points (phase 1 + phase 2) | Take first | Then | Skip or leave last |
|---|---|---|---|---|
| Nezekan (12) | 114 (phase 1: 90, phase 2: 24) | Condemnation, Radiant Recovery, Healing Light, Bolt, Judgment Thunder, Earth's Retribution, Chain of Torment, Debilitating Mark; Healing Enhancement ×2, Empyrean Lord's Grace ×2; Combat Speed and Cooldown Reduction corners | Divine Aura, Light of Regeneration; Warm Benediction ×2, Immortal Veil ×2 | Empyrean Lords' Benediction, Scattershot, Defiance; Crit Resist and Max MP greys |
| Zikel (20) | 108 (phase 1: 82, phase 2: 26) | Damage Boost and Damage Tolerance corners; core skills; Earth's Grace ×2 | Radiant Benediction ×2; Defiance | Heal Block, Survival Willpower, Prayer of Concentration |
| Vaizel (30) | 106 (phase 1: 83, phase 2: 23) | Crit Damage Boost corners (skip Crit Damage Tolerance); core skills | Empyrean Lord's Grace, Earth's Grace, Healing Enhancement, Radiant Benediction | Heal Block, Survival Willpower |
| Triniel (40) | 134 (phase 1: 93, phase 2: 41) | Multi-hit Chance corners; core skills | Chain of Torment, Immortal Veil, Empyrean Lord's Grace | Multi-hit Resist corners |
| Azphel (45) | 128 (phase 1: 58, phase 2: 70) | PvP only: PvP Damage Boost ×4 corners, PvP Accuracy/Evasion, Status Resist | PvP Damage Tolerance | Everything, for PvE |
Recommended board setups
Numbered nodes are phase 1: buy them in that order, starting next to the center star. Outlined nodes are phase 2. Faded nodes with a red X are skips; a dimmed node without an X is only a connector. Global corners give +1.5% each.
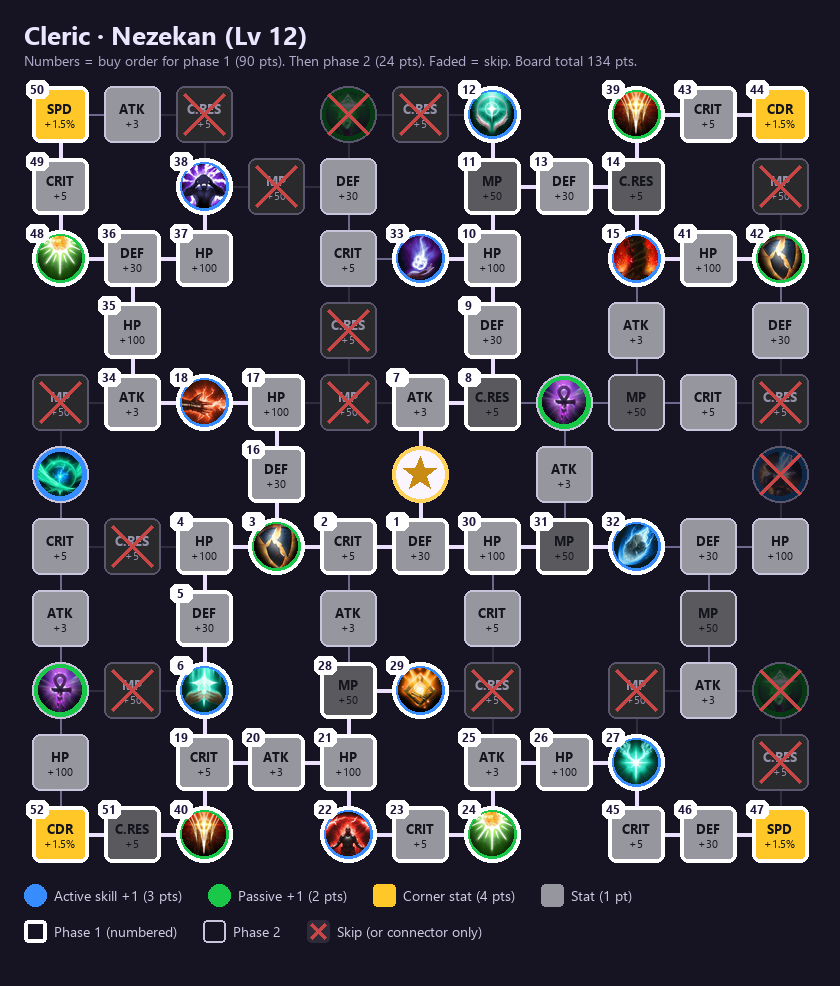
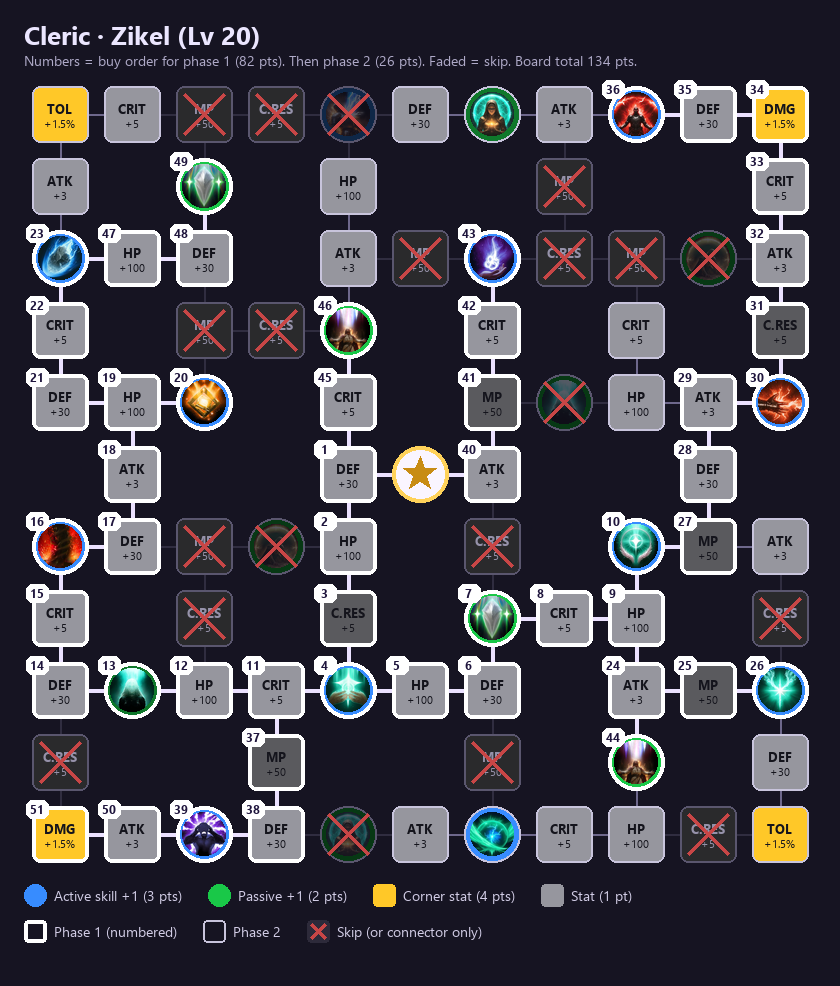
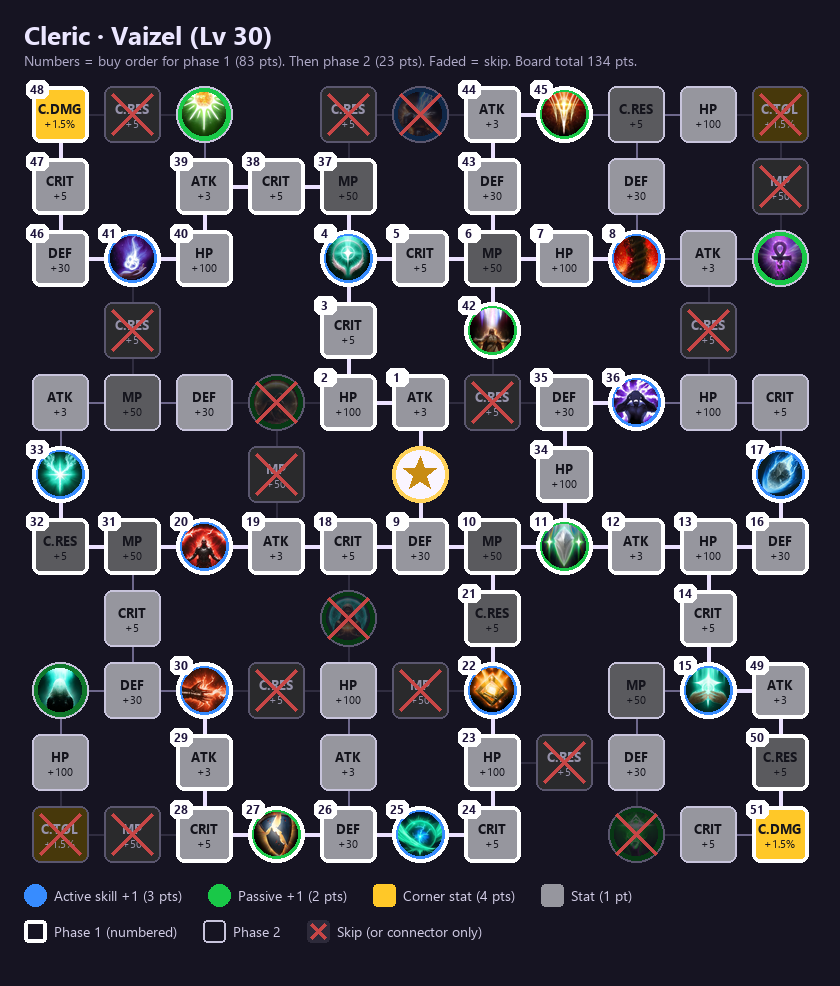
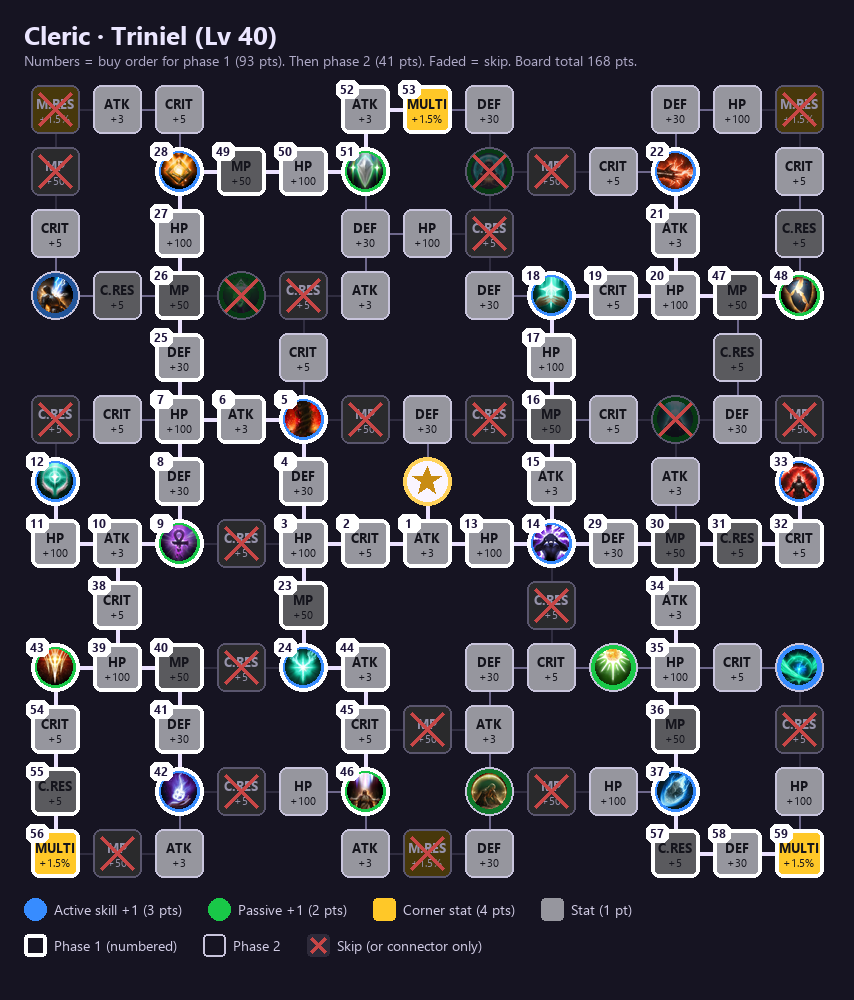
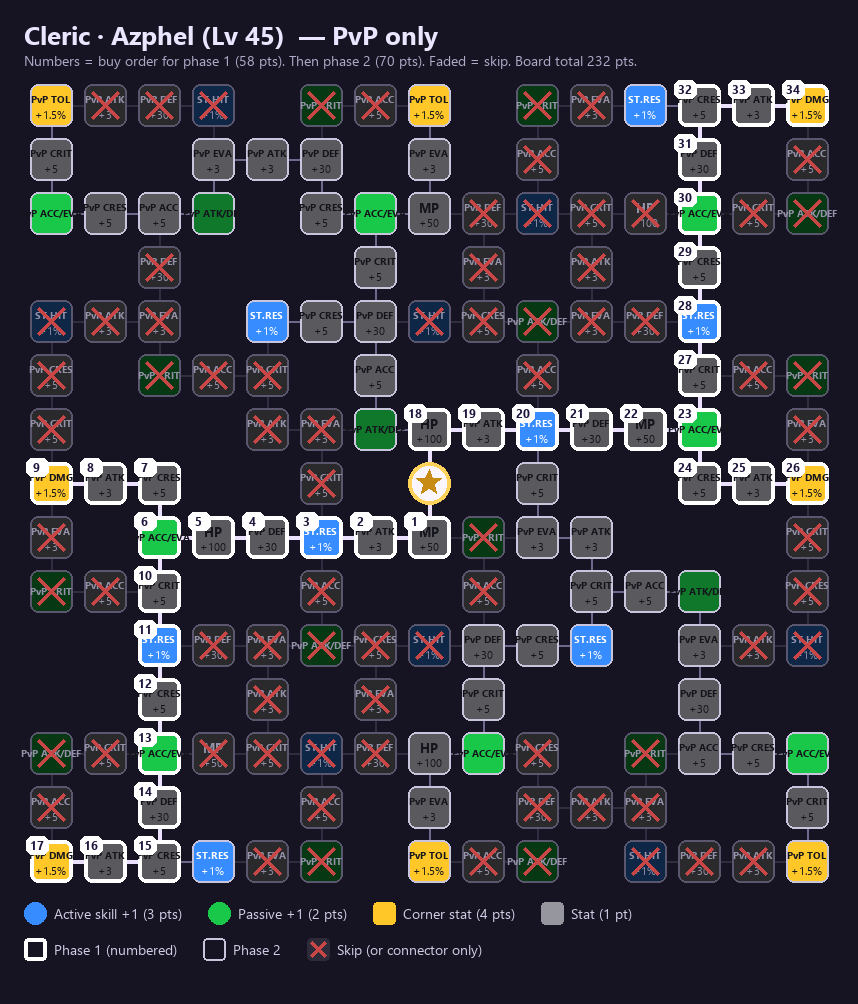
Layouts are from the metabot global planner. The four PvE boards hold 570 points; this plan spends 462 of them (phase 1: 348, phase 2: 114), and you can't fill all of it. Crystals come from leveling (~136), sealed dungeons (~122), regional quests (~58) and the Shugo and Nightmare shops (50 each per character).
Ariel board (added Oct 21): a sixth board whose points come only from Daevanion Crystal: Ariel, morphed from Ariel Fragments from all four Hard Expeditions (Krao Cave and Draupnir at 2,600; guaranteed in Urugugu Canyon and Vakron at 2,700); 100 fragments make one crystal (+1 gear score). Cap: 30 per character in the patch text, 30 per dungeon (120) per two community guides. Layout: 152 nodes and 232 points, with PvE Damage Boost and PvE Damage Tolerance cores, smaller PvE stat nodes and no skill nodes; nobody can fill it yet.
Gear
Attack and weapon-side damage lines, Accuracy until bosses stop parrying, and Earth's Grace and Empyrean Lord's Grace on armor and jewelry. Percentages are top Korean Clerics with the line.
| Slot | Soul engravings to roll | Item passives to hunt |
|---|---|---|
| Weapon (mace), guard | Weapon Damage Boost, Might, Combat Speed (100%); Damage Boost (99%); Multi-hit (97–98%); Precision (98%) | None; never put skills here |
| Helmet, cape | Strike, Attack increase (98–99%), Attack, Incoming Heal (helmet, 76%); Double Chance | Empyrean Lord's Grace, Earth's Grace (62–67%) |
| Chest | Damage Boost (100%), Attack (93%) | Same two |
| Pants | Attack increase, Damage Tolerance (98%), Perfect, Attack | Same two |
| Gloves | Combat Speed (100%), Attack (94%), Perfect | Same two |
| Boots | Move Speed (100%), Attack (93%), Perfect | Same two |
| Shoulders | Crit Damage Amp (100%), Attack (95%), Double Chance | Same two |
| Necklace, earrings | Attack, Crit (93–96%), Accuracy (91–95%) | Earth's Grace, Empyrean Lord's Grace (70%); Healing Enhancement on earrings (56%) |
| Rings | Attack, Might, Precision | Skill lines: Condemnation (67%), Radiant Recovery (65%), Earth's Retribution (65%), Bolt (65%), Divine Aura (64%) |
| Bracelet | Korea only (level-50 bracelets): Time, Illusion, Destruction (99–100%); Wisdom (99%); Justice (77%). Global Ascension and quest bracelets have fixed lines; the Abyssal Bracelet (Ludra, item 86) rolls four Empyrean Lord stats at 9–17 each | none |
| Brooch | Might, Precision, Crit, Accuracy | none |
Global top players (level 45, Oct 8):
- Weapon: Splendent Dark Dragon Lord Mace (29%) or Aulamus Mace (21%), +15. Guard: Nuakum Guard (37%), +15.
- Armor: Nuakum set (58–74% per slot), +10. Jewelry: Aulamus Necklace (42%), Enraged Kromede Earrings and Ring (33–37%), Ascension Bracelet (50%).
- Fixed slots: Noble Belt, Revelation Amulet (97%), Clash Rune.
- Long term: crafted Dragon Lord pieces (see Gear economy). Korea's top tier is Ludra's Fatal Mace and Ludra's Heart with Eroded Afterimage armor (41–51%).
Manastones, stats, Arcana: Weapon Damage Boost, Crit Damage and Damage Boost stones, then Attack (HP on armor; Crit, Accuracy and MP on jewelry). Boss healer stats: Attack, Accuracy, Cooldown Reduction, Combat Speed, Crit Damage. Arcana: Chalice of Vigor for any skill short of 20; Parchment for Condemnation, Radiant Recovery, Earth's Retribution or Bolt; Compass for Scattershot, Healing Light, Divine Aura or Judgment Thunder; Bell for Empyrean Lord's Grace; Mirror for Earth's Grace or Healing Enhancement. Two camps: global guides run the Primal Vigor 4-piece (+150 PvE Attack at 70% HP or more; 2-piece +60), while Korean top players mix in Magic cards, and the Magic Armor 4-piece gives +1,000 PvE Defense at 50% MP or more. Korean top Clerics run Bell of Magic 96%, Chalice of Vigor 95%, Parchment 94%, Mirror 86%, Compass 83%.
Accuracy
- Your Accuracy cancels the target's Block one for one; leftover Block is the chance a hit is parried. Extra Accuracy past Block does nothing.
- A parry takes roughly 20–40% off a hit (two guides say over half), and hits from behind can't be parried.
- Block Penetration (some titles and wings) also ignores the target's Block chance.
- Check the parry percentage per boss in the in-game Combat Analysis. High means raise Accuracy (Earth's Grace and Light of Protection's rank 10 pick each add +100, and Freedom Pantheon stats, bracelets and weapon Precision options add more); near zero means stop.
- Published targets (about 1,100 early; 1,300–1,400 for the Ludra raid) are unverified. The aion2timers calculator has boss presets.
Gear economy
Gear by item level (level 45). Only item level moves at the cap. This table is per piece; the dungeon gates under "After 45" use your total item level.
| Item level | Source | Note |
|---|---|---|
| 46 | Named elites on home maps, Fallen Ancient God set | Filler |
| 54 | Krao Cave and Draupnir Conquest (Draupnir Exploration too) | |
| 62–70 | Craft True Dragon Lord (62) for slots that won't drop; farm Vakron Sky Island and Urugugu Canyon for 70 | |
| 86 | Fire Temple, Ferocious Horn Den | Gear Change Vouchers for missing slots, guards first |
| 102 | Ludra raid weapons and Ludra's Heart guard (Abyssal Forge: Ludra, since Nov 4); armor and accessories only from Splendent Wise Dragon Lord crafts | Best gear |
- Craft chain: True Dragon Lord (62), Splendent (70), White (78), Splendent (86), Wise (94), Splendent Wise (102). Each step has a 25% chance of the Splendent version. Asmodian names: Star, Dark, Ebony.
- Mastery: True Dragon Lord pieces need crafting mastery 55 or 60, and mastery stops at 50 until you finish the upgrade quest.
- Don't waste: Enhance Stones on Common or Rare gear, or on Legend (blue) pieces you'll replace (the belt and amulet are the exception); Superior manastones on gear you'll replace; restarting a craft (upgrades carry enhancement, amplification and soul binding forward); Abyss Points on Potential, which gives only PvP stats.
Enhancement (Unique gear, max +15). +10 is guaranteed. +11 to +15 succeed 65, 50, 35, 25 and 20%, with +5% after each failure. A failure only costs materials. Expect about 22 attempts, 15M Kinah and 191,000 Enhance Stones to reach +15 on item level 102 gear. Keep the weapon at +10 until you have the final one. Amplified Enhancement comes after +15: its steps succeed 66, 50, 33, 25 and 20% (with pity), and item level caps it at +1 for 54–62, +3 for 70 and +5 for 86 and up. Since Oct 28, crafted Dragon Lord gear has the same caps (True and Star +3, White and Dark +5), and Gear Transfer can move enhancement from Expedition gear onto crafted gear.
Soul binding (Unique gear only). It unlocks random stats and makes the item untradeable. The first step costs 30,000 Kinah and 10 Soul Codex, the tenth 632,000 Kinah and 102 Soul Codex. Rebinding costs 300,000 Kinah and 3 Soul Codex.
Manastones. Slots by grade: Common 1, Rare 2, Legend (blue) 3, Unique 4 (amulet, belt and rune have none). Jewelry takes Soulstones from the same pools. Engraving fills every slot at once for 500–2,000 Kinah by gear grade and can't fail, and each line adds gear score (+1 grey to +4 yellow).
- Attack, Defense, Accuracy, Evasion, Crit and Crit Resist each roll about 10% of the time; Combat Speed and cooldown stats can't be rolled.
- Rerolling overwrites the old stat and consumes the stone. Enhancing keeps stones; dismantling gear destroys them.
- Use regular stones for PvE; Abyssal stones split a third of rolls onto PvP stats.
- Lesser stones drop; Alchemy crafts the rest. 5 Lesser, 3 Spiritstone Powder and 2 Professional Ink make an Intermediate (mastery 20), with a 20% chance of a Superior; the dedicated Superior recipe is 30 Intermediate, 10 Powder and 2 Exceptional Ink at mastery 85.
Theostones (Epic and Unique weapons only). A weapon engraving with a chance to proc on attack; identical stones don't stack.
- PvE pick: Beritra's Selfishness (Wind AoE, 20% proc), the database's healer pick. PvP: Beritra's Conspiracy (seal).
- How to get them: the 3 regional quests per faction (Rare chest plus 100,000 Kinah each), the Abyss Trade Shop Selection Chest (35,000 Abyss Points), the Season Shop (17,500 Oath Coin, limit 10), the Arena shop (1 Arena Token, 5 per week) and Daeva Pass.
- Upgrading: combining gives Rare to Epic 11.1% and Epic to Unique 9.1%; Unique stones come only from combining.
Consumables. Battle Enhance Scroll gives +10% Damage Boost and +10% Damage Tolerance for 5 minutes (quests, achievements and attendance, or the Season Shop for 6,000 Oath Coin, limit 10 per account; the shop closes Dec 16). Courage Scroll gives +10% Combat Speed for 5 minutes (1,000 Kinah). Food is defensive only.
Check your numbers in game. Use the in-game Combat Analysis for parry rates and rotation. Third-party macros and tools risk bans, and I can't confirm third-party meters are safe.
Essence Extraction (gathering)
Essence Extraction is the game's one gathering skill: Ore, Gem, Log, Herb, Cooking Ingredient and Odyle nodes in Verteron, Altgard and Chaotic Lower Reshanta (Odyle also in the Expeditions). It feeds crafting (Dragon Lord gear, manastones) and the Radiant Odyle that unseals dungeon wings. Each node gives two to four extractions; the minigame fills a blue Success gauge against an orange Failure gauge, and your odds improve with use.
- Cap at Novice 50: proficiency stops at level 50 until you finish "[Upgrade] Essence Extraction Specialty Skill" (Korius for Elyos, Alzirr for Asmodians): extract one Splendent Ruby from a Ruby node (Elyos: around the Verteron Fortress Ruins; Asmodians: near Quay Campsite and Calderon Canyon) and hand it in. Professional runs 51–100.
- Fast proficiency: Orichalcum, Raydam, Azpha and Odyle nodes. Odyle sits in the air, and running out of flight stamina cancels the extraction. Since Oct 28, gathering needs level 45 and is capped at 1,000 extractions per server per day.
Points. Every proficiency level gives a Common point (45 by level 50, 95 by level 100). Specialty points come every 10 levels, two at 50, 80, 90 and 100 (6 by level 50, 14 by level 100).
| Common skill | Triggers on | Level 5 | Level 10 |
|---|---|---|---|
| Proficient Handling | Every success | +25 Success Gauge gain | +50 |
| Delicate Touch | Every failure | −40 Failure Gauge gain | −80 |
| Lady Luck | Every success | 24% chance of a ×2.5 gauge boost | 40% chance of ×2.5 or ×4 |
Levels 1–5 cost 1 to 5 points (15 per skill, Novice); levels 6–10 cost 5 each (25 more, Professional).
- Novice: all three to 5, which is exactly the 45 points you have.
- Professional: the 50 extra points max two skills. Take Lady Luck and Proficient Handling to 10 (both fire on successes, and the ×2.5 or ×4 boost likely multiplies Proficient Handling's gain) and keep Delicate Touch at 5; swap it in if failures keep ending your extractions on high-level nodes. This split is my reading of the tooltips; no guide publishes one.
Specialty skills. Every node type has the same tree, 7 points to max: Seeker (1 point, shows that node type on the minimap), Plentiful Harvest (3 levels: 10, 20 or 30% chance of double materials) and Appraiser (3 levels: 10, 20 or 30% chance to reroll to a higher grade; for Cooking Ingredients it rerolls the quantity). Only level 1 of each opens at Novice, and 14 points max two of the six trees.
| Stage | Spend | Why |
|---|---|---|
| Novice (6 points) | Odyle Seeker, Odyle Plentiful Harvest 1 and Odyle Appraiser 1; then Seekers for the two node types you farm most | Appraiser pushes Odyle toward Radiant Odyle for wing unsealing; Seekers save travel |
| Professional (8 more) | Odyle Plentiful Harvest and Appraiser to 3, then Plentiful Harvest and Appraiser for one crafting material (usually Ore or Gems for Dragon Lord crafts) | Two trees maxed |
Check in game whether the points can be reset before you commit.
Gear score milestones
Gear score is the item level shown under your character level, and it gates almost all level-45 content. Climb it in the order below: each bracket lists what opens, what to do and what to skip.
What counts. Every equipped piece's item level, plus +1 per enhancement level, +5 per Amplify level, manastone lines (+1 grey, +2 green, +3 blue, +4 yellow), +1 per Daevanion point spent, +40 per Clash Rune, +3 per Rare Theostone, and Arcana cards (+20 / 40 / 60 / 80 by grade, +1 per card level). Each Ariel crystal adds +1. Soul binding, skill points, Stigmas, titles, pets and Genus Insight, the Pantheon and the closet raise Combat Power only; sources split on whether wings add gear score.
| Gear score | Opens |
|---|---|
| 700 | Krao Cave and Draupnir Conquest (Unique gear 54), Draupnir Exploration |
| 1,000 | Ascension Trial and Subjugation on Easy (the Abyss and Arena need only level 45 in the client data, though some guides list them here) |
| 1,400 | Vakron Sky Island and Urugugu Canyon Conquest (Unique gear 70), Vakron Exploration |
| 1,500 | Ascension Trial and Subjugation on Normal |
| 1,600 | Transcendence stage 1 (Deus Research Base, Shattered Arkanis): Arcana |
| 1,900 | Transcendence stage 2 (Epic Arcana) |
| 2,000 | Ascension Trial on Hard |
| 2,100 | Fire Temple and Ferocious Horn Den Conquest (Unique gear 86), Horn Den Exploration |
| 2,200 / 2,500 | Transcendence stages 3 and 4 (Unique Arcana); Ascension Trial on Challenge at 2,500 |
| 2,600 | Krao Cave and Draupnir on Hard (added Oct 21; the patch calls them Expedition): Philosopher's Stone: Revelation, every Unique crafting material, Ariel Fragments for the new Ariel board |
| 2,700 | Urugugu Canyon and Vakron Sky Island on Hard (added Oct 28): Philosopher's Stone: Revelation, guaranteed Ariel Fragments, every Unique crafting material |
| 2,800 | Abyssal Forge: Ludra on Normal (open since Nov 4; 1-hour runs) |
| 3,000 | Abyssal Forge: Ludra on Hard |
Gates are from the global client data (metabot, Corpus). Some creator videos quote 1,500, 2,200 and 2,700 instead; the client wins.
Combat Power
Combat Power (CP) is the server's own rating and NC hasn't published the formula. It weights attack over defense (Korean estimates: Attack 1.25, Defense 1, secondary stats 0.25, about 100 per 1% stat). Gates check item level only, but party finders ask for CP, and global CP runs about a quarter of Korean CP.
| Content | CP parties ask for |
|---|---|
| Krao Cave and Draupnir (700) | 60–65K |
| Vakron and Urugugu (1,400) | 75–80K |
| Fire Temple and Horn Den (2,100) | 100–110K |
| Transcendence stage 4 | 130–135K |
| Hard Expeditions (2,600) | 150K |
| Hard Expeditions (2,700) | 160–165K |
| Ludra Normal | 175–190K |
| Ludra Hard | 200K+ |
The targets are AionFlex entry CP (the 25th percentile of players who killed the boss, Nov 7). The cheapest CP comes from Stigmas, Daevanion points, titles and Genus Insight, which need no new gear.
Level 45 to 1,000: finish the free gear
- Story and quests: finish the main story and the last Ascension and Abyss quests for the Spiritforged weapon (Unique, 45), guard and bracelet.
- Clash Runes: open both rune chests from the Verteron or Altgard regional quests; at +40 each, two runes alone carried one creator to 1,000.
- Belt and amulet: Stronghold scrolls (2 per home Stronghold) take the Noble Belt to +10, and Monolith Resonance scrolls (one per home Monolith level, so feed it Empyrean Trace feathers) take the Revelation Amulet to +10; enhancing them always succeeds. Then Substance Morph each one (Alt+H → Gear; at +10 and unequipped, always succeeds, returns at +0) from Rare (item 13) to Legend, the blue grade some guides call Epic (item 36, +23 each).
- Spend: every Daevanion point (+1 each), and the Spiritforged weapon to +10 (about 406,000 Kinah and 16,000 Enhance Stones).
- Odyle: bank it for 1,400, where Vakron and Urugugu pay more per point, but never let it reach the 560 cap.
1,000 to 1,400: points, not drops
- Daevanion crystals: clear every sealed dungeon (2 each, +122 total) and the regional quests (+58). Feathers to Monolith level 16 give 36 Azphel crystals, and the Nightmare and Shugo shops sell 50 each (+100).
- Belt and amulet to Unique: take each Legend piece to +10 (+10 gear score each; about 1.58M Kinah and 63,000 Enhance Stones per piece), then Substance Morph it to Unique (item 65, +29 each). Unique also goes to +10 (+10 more each, about 5M Kinah per piece) when Kinah allows.
- Clash Runes to +1, then stop: +1 always succeeds; +2 is 80%, then 66, 50 and 33%, down to 10% at +10, and sources disagree on whether a failure drops a level or destroys the rune.
- Weapon, guard, bracelet to +10, with one grey or green manastone line each. The Spiritforged Guard comes from the Abyss (Forgotten Commander).
- Every Unique piece to +10: enhancing to +10 always succeeds, so finish the +6 and +7 pieces you already wear (+1 gear score per level).
- Fill every manastone slot: gear arrives with open slots (Rare 2, Legend 3, Unique 4; jewelry takes Soulstones). Engraving fills them all at once for 500–2,000 Kinah and can't fail. Grey or green lines (+1 or +2) are enough on pieces you'll replace; Lesser stones drop from named level-45 mobs in your home region and Lower Reshanta, and the Abyss shop sells 50 Lesser Abyssal stones a week (1,000 Abyss Points each). Fifty-odd slots at +2 is over +100.
- Swap leftover quest pieces for item-54 Unique: Draupnir Conquest drops Bakarma armor, and Krao Cave Conquest drops Berk necklace, earrings and rings (and Rupture weapons). Replacing an item-40 piece is +14 before enhancing; the usual weak slots are the helm, pants, necklace, earrings, second ring and a quest bracelet.
- Worked example (a 1,231 Chanter, Oct 15): +6 Unique gloves, boots, cloak and ring, a +7 bracelet, a +0 Legend belt and amulet, item-40 helm, pants, necklace and earrings, and few manastones. Finishing the +10s (+19), belt and amulet to Unique (+78) and green manastones cover the 169 it needed; two or three item-54 swaps add a margin.
- New content: start Ascension Trial (Easy), Subjugation and Arena; this is where parry rates first show up, so check Accuracy (see Accuracy).
- Skip: enhancing item-43 quest gear past +5, Clash Runes past +1, Superior manastones, or anything you'll replace at 1,400.
1,400 to 2,800: the full route
Odyle Energy sets the pace until about 2,500, then Kinah and Enhance Stones. A claim is one cube at 40 Odyle: regeneration pays for about 21 a week, the shop about 20 more (4 per character, 16 per server), and the Odyle Energy Boost mails 4 a day until Nov 10, so farm hardest now.
| Step | Run | Upgrade, in this order | Gear score | Time (regen only; with event and shop energy) |
|---|---|---|---|---|
| 1,400 → 1,600 | Vakron Exploration (pays like Conquest since Nov 4) or Conquest, plus Urugugu Conquest | Replace the lowest pieces first (item 40 → 70 is about +30); new pieces to +5 with green manastones | About +200 | 25–35 claims: 1 week; 3–4 days |
| 1,600 → 1,900 | Transcendence stage 1 until all five Arcana slots are filled, then back to Vakron and Urugugu | Five cards (+20 each at Common, +40 at Rare); finish the item-70 set and take it to +10; buy the 50 Daevanion Crystals in the Nightmare and Shugo shops | About +250 | About 50 claims: 2–3 weeks |
| 1,900 → 2,100 | Transcendence stage 2; Ascension Trial on Hard from 2,000 for Mysterious Crystals | Epic cards (+20 over Rare); transmute a Unique Chalice (5 Mysterious Crystals and 2M Kinah, +80); Vakron Guard (2 vouchers and 1.5M Kinah) | About +150 to +200 | 30–40 claims: about 2 weeks |
| 2,100 → 2,500 | Horn Den Exploration (pays like Conquest since Nov 4) or Conquest for armor and Fire Temple Conquest (accessories); Transcendence stage 3 at 2,200 (aim for an S rank: several guides say it opens stage 4) | Item 86 in every slot (+16 each). Move the +10 across with Gear Transfer, or a swap onto a +0 piece nets only +6. Nuakum Guard: 3 vouchers and 2M Kinah | About +250 | 120–150 claims: 6–7 weeks; 2–3 weeks |
| 2,500 → 2,800 | Transcendence stage 4; Krao Cave and Draupnir on Hard (2,600) and Urugugu and Vakron on Hard (2,700) | Unique cards and their levels (+125); Ariel crystals (+1 each, up to 30); re-engrave manastones to blue (+64); weapon and guard to +15 (+5 each, about 12M Kinah each) and Amplify (+5 a level); belt and amulet to +10 (+20) | About +300 | 4–6 weeks; Kinah and Enhance Stones are the limit |
| 2,800 → 3,000 | Abyssal Forge: Ludra on Normal (2,800) and Hard (3,000) | Abyssal Bracelets (Amplify cap 3; questlog's global table lists item 70, GameWith 86, so +27 or +43 each; check the tooltip) are the biggest jump left, then Ludra's Bracelet (Amplify up to 5) and the Ludra weapon (102, +16) | About +100 | Open now |
Times come from published drop rates and one creator's pace (2,500 in two weekly resets with membership; expect four or five without), not measured player data.
- Guaranteed picks: every 21 claims at Vakron and Urugugu, every 28 at Fire Temple and Horn Den. Fire Temple's never offers the weapon (3 vouchers, 2M Kinah and an off-class Enraged Kromede weapon, about 84 claims) and Horn Den's never offers the guard. Since Nov 4, Draupnir, Vakron and Horn Den Exploration pay like Conquest (same guaranteed-pick count, Amplify Stone Fragments, bound crafting materials), but their Kinah shrinks after 40 runs, to 20% from run 71.
- Gear-score math: a one-tier swap (54 → 70 → 86 → 102) is +16 at the same enhancement; +1 per enhancement level, and +10 → +15 costs about 12M Kinah and 130,000 Enhance Stones per item-86 piece for +5; Amplify (after +15) is +5 a level, about 6.3M Kinah and 58 Amplify Stones for three levels; manastone lines are +1 (grey) to +4 (yellow), 64 lines on a full Unique set; Arcana is +20 per grade plus +1 per card level (a full Unique set at +5 is 425).
- Crafting beats farming only for the weapon (about 240M Kinah to item 102, with 5 Soul Binding lines against Kromede's 3). Since Oct 28, Kromede and Nuakum enhancement can move down onto crafted gear, so enhancing them isn't wasted. Since Nov 4, True and Star Dragon gear also has an always-succeed recipe (bound, no Great Success).
- Bracelets stay at item 43 until Ludra; no other source has been found.
- Cleric weapon: the Enraged Kromede Warhammer has the same base Attack as the item-86 crafted mace, only with 3 engraving lines instead of 5, so most top questlog Clerics use it at 86 and later move its enhancement onto a crafted Splendent Dragon Lord Mace (29% of top players). Craft rings early for their skill line.
2,600 and 2,700: Hard Expeditions and the Ariel board
- Krao Cave and Draupnir on Hard (2,600, Oct 21) and Urugugu Canyon and Vakron Sky Island on Hard (2,700, Oct 28): a 4-minute boss Frenzy timer and 3 revives per player.
- Rewards: a chance at Philosopher's Stone: Revelation (or pick it as the guaranteed reward), every Unique crafting material, Wrathful Mind, Will and Ego, Ariel Fragments (guaranteed at Urugugu and Vakron), more Kinah than Normal, and Expedition Hero Artwork. Hard achievements give Unique skins.
- Claims and checks: 40 Odyle per claim and 60–90 Ariel Fragments per final-boss cube (client data); the guaranteed pick comes after 28 claims per one guide (another says 14 at Krao Cave and Draupnir, 21 at Urugugu). Stagger Berk at about 50% and hide behind rocks for Wave of Fury; stop attacking during Lakshmi's reflection and before Raur's Counterstrike Stance; stack for Auldor's Tempest Strike; at Thamon, red means physical stops and purple magic stops. Entry CP runs 147–151K at 2,600 and 161–163K at 2,700.
- Ariel Fragments: Substance Morph turns 100 into a Daevanion Crystal: Ariel (up to 30 per character in the patch text; one guide reads it as 30 per dungeon) and 1 into 5 Enhance Stones with no limit.
- Ariel board: a new Daevanion board whose points come only from those crystals; 152 nodes and 232 points, with PvE Damage Boost and Tolerance cores and no skill nodes.
2,800 and up: Ludra
- Abyssal Forge: Ludra opened Nov 4: Normal at 2,800 item level, Hard at 3,000, with a 1-hour limit per run; Normal drops the same item types as Hard at lower rates. The first 20 parties per region to clear Hard get titles, and anyone who clears either mode before Nov 24 gets Ludra's Nemesis.
- Drops: Ludra's weapon and guard, Abyssal Bracelets (Amplify up to 3), Sealed Abyssal Waves Wings and Artwork: Abyssal Ludra. Take a Gear Change Voucher as the guaranteed reward: Substance Morph turns one into a weapon selection chest, and 6 Ludra vouchers (or 3 Hard ones) make Ludra's Bracelet (Amplify up to 5); 2 Normal vouchers trade for 1 Hard voucher.
- Fire Temple and Ferocious Horn Den on Hard are in the client at 2,800 but locked (a Nov 4 hotfix removed the Hard option that briefly showed); the client also lists higher Conquest tiers and Korean raids at 3,500 and 4,300.
- Format: 10 players in two parties of five, 2 revives, and one counted final-boss kill a week (Wednesday reset); the bosses are level 75. As of Nov 7 there were 11 Eternal Ludra kills on Normal and none on Hard.
- Ready gear (community): Kromede weapon and Nuakum guard at +16 to +18, armor +10 to +15; for Hard, desolo targets +16 everywhere, +17 weapons and all 120 Ariel crystals. Parties ask about 175–190K CP for Normal and 200K+ for Hard.
- Reactor: break the auxiliary reactors.
- Rahu and Ketu (split boss): pass Rahu's SOS Bomb on (3 failures wipe the party); on Ketu the tank blocks the jump, face the red side and turn away from the blue, and the crystals give immunity.
- Eternal Ludra: berserk at 10:00; the red tower needs a blocker, then come two Bingo grids, a colour split and the Thunder Zone. The Reactor and Ludra details come from early-access and client data (mobalytics live guides), so expect changes.
- Loot: sites disagree whether the guaranteed voucher comes every 2 or every 4 kills, and a specific Ludra weapon drops at about 0.3–0.6% per kill, so plan on vouchers. A crafted Splendent Wise or Ebony (102) weapon matches a Ludra weapon's Attack at max enhancement with more lines, so the Ludra weapon is the no-craft route and Ludra's Heart and the bracelets are the real upgrades. Ludra Hunt titles have no stats.
- Cleric duties: slot Summon Resurrection for Ludra (MrRosaPony replaces Noble Aura; zeminah calls it mandatory in raids). Resurrect after Ketu's soul-stone phase and Eternal Ludra's Thunder Zone, and never take a mechanic yourself; Clerics are in 99.8% of Ludra fights, and Korean clears used two. On Hard Expeditions (3 revives each, 15 per party, 4-minute Frenzy) save big heals for telegraphed damage and spend resurrections deliberately.
Rules for every bracket
- Spend Odyle on the highest tier you can enter, and never let it cap (560, or 840 with membership). Membership reportedly also allows two Odyle injections per Expedition or Transcendence cube (80 Odyle for double rewards) and makes Sanctuary cubes eligible; NC hasn't published global numbers.
- Open every Conquest and Transcendence cube: leaving one unopened burns the shared 10-per-week counter, and at 0 you can't enter until Wednesday's reset.
- Enhancement priority is weapon, guard, bracelet, then the rest; only enhance past +5 on gear you'll keep.
- Belt and amulet morphs are once per character per grade; the 20-per-server weekly cap added Oct 6 covers only turning Sealed Wings into Enhance Stones. Grades run Common, Rare (green), Legend (blue; some guides say Epic), Unique (gold).
Cleric at each bracket. Before your first Vakron runs at 1,400, raise Healing Light to 16. Craft rings early: they carry an extra skill line (Condemnation, Radiant Recovery). At 1,600, Parchment for Condemnation or Radiant Recovery comes first. Top global Clerics used a Splendent Dark Dragon Lord Mace (29%) or an Aulamus Mace (21%) in the Oct 8 armory; questlog Clerics keep the Spiritforged Mace to 2,100 (nobody uses Aulamus), take the Kromede Warhammer (5 of 8) and end on a Splendent Wise or Ebony (102) mace. softpetalflower found the Splendent Wise Mace matches Ludra's Fatal Mace's Attack at max enhancement with more lines, so the Ludra mace is the no-craft route.
Transcendence dungeons
Season 1 (to Dec 16) has two Transcendence dungeons: Deus Research Base drops Bell, Compass and Chalice cards, and Shattered Arkanis drops Mirror, Parchment and Chalice. Farm the one whose card slots your build still needs; for the Cleric, start with either dungeon (lean Shattered Arkanis).
| Deus Research Base | Shattered Arkanis | |
|---|---|---|
| Bosses | Gelcos, Nazmun, Atiel (final) | Siliator of Deceit, Ruthilis of Pain, Talisra of the Void (final) |
| Arcana | Bell, Compass, Chalice | Mirror, Parchment, Chalice |
| Stage 2 / 3 / 4 effect | Balance (dying Elites leave damage zones) / Wrath (trash gains Damage Boost below 50% HP) / Judgment (boss hits stack, then explode on everyone nearby) | Poison Blood (dying Elites leave zones that heal monsters) / Elevation (each kill buffs nearby trash) / Tolerance (bigger boss Stagger gauges) |
| Hardest fight | Atiel: tethers that tick until players spread, knockback waves off a shrinking platform, and a ~10 s Stagger check (Morphic World) that wipes the party if failed | Talisra: take only your own orb colour, follow the barrier colour sequence, break the called pillar within ~6 s, and free players from Diamond Jail |
| Classes in clears | Cleric 89%, Chanter 66%, Gladiator 62%, Archer 61%, Templar 55%, Sorcerer 47% | Cleric 87%, Chanter 67%, Gladiator 62%, Archer 59%, Templar 55%, Sorcerer 50% |
| Stage | Gate | Best Bell, Compass, Mirror, Parchment | Best Chalice | Use it for |
|---|---|---|---|---|
| 1 | 1,600 | Rare | Common | Fill all five slots (+20 each even at Common) |
| 2 | 1,900 | Epic | Rare | Main farm to 2,200; easier since the Oct 28 boss nerf |
| 3 | 2,200 | Unique | Epic (a guaranteed Chalice roll) | Aim for an S-rank clear: several guides say it opens stage 4 (unconfirmed); few groups run it |
| 4 | 2,500 | Unique | Unique (the only source, about 18% a cube) | Main farm from 2,500; also the most Kinah and Amplify Stone Fragments |
Best dungeon by class:
| Class | Farm first | Cards to chase there | Then | Why |
|---|---|---|---|---|
| Gladiator | Shattered Arkanis | Parchment (Overhead Slam, Ruinous Blow), Mirror | Deus for Compass (Rending Blow) and Bell of Magic | Good in both; Arkanis stage 4's bigger Stagger gauges reward Gladiator Stagger. Save Stagger skills for Atiel's Morphic World check |
| Templar | Shattered Arkanis | Parchment (Judgment, Punishment; Punishment is the biggest single hit on every Atiel stage and on Talisra stage 4) | Deus for Compass (Pummel, Shield Smite) and Bell (Fury, Punishing Benediction) | Deus is the harder tank job: drag Nazmun, take the tank-targeted lines and bombs, and tank stage 4 Judgment stacks away from the melee |
| Archer | Deus Research Base | Compass (Deadshot, Gale Arrow), Bell (Hunter's Resolve) | Arkanis for Parchment (Snipe, Tempest Shot) and Mirror (Focused Eye) | Slightly higher damage in Deus. In Arkanis the ranged player baits the "furthest player" attacks (Siliator's line, Ruthilis's and Talisra's jumps) |
| Sorcerer | Shattered Arkanis | Parchment (Hellfire, Blaze), Mirror (Robe of Flame) | Deus for a Compass and a Bell | Even in both. AoE suits stage 3 trash; Talisra's colour and pillar phases interrupt long casts, and Atiel's waves need movement |
| Cleric | Either (lean Arkanis) | Arkanis: Parchment (Condemnation), Mirror (Healing Enhancement). Deus: Compass (Healing Light), Bell of Magic | The other dungeon | In almost every clear. Heal pressure peaks on Atiel: tethers tick until players spread, then a shared hit, then knockback waves |
| Chanter | Shattered Arkanis | Chalice of Vigor (Onslaught), Parchment of Vigor (Dark Crush, Onslaught, Spinning Strike), Mirror | Deus for Bell of Magic and Compass of Vigor | The second most-wanted class; higher typical damage in Arkanis |
- Rewards: entry is free; taking the cube spends a reward count (1 per 12 hours, cap 14) and 40 Odyle. Every cube costs the same, so spend counts on the highest stage your group clears reliably.
- Sets don't decide the dungeon: both drop Vigor and Magic cards; the card slot does. The version you keep decides your Empyrean Lord stat (see Empyrean Lord stats and Pantheon). Duplicates extract into Mysterious Crystals, and 5 crystals and 2M Kinah transmute a Unique card of your choice.
- Party: 2–5 players; a player who leaves mid-run fails the dungeon for everyone. AionFlex entry Combat Power (25th percentile of players who killed the boss, Nov 7) is 80–81K at stage 1, 91K at 2, 109–110K at 3 and 134K at 4; most uploads predate the Oct 28 nerf, so post-nerf needs are slightly lower.
- Oct 28 boss nerf: stage 1 boss Attack −15%, stages 2–4 boss Attack and Damage Boost −10%, stages 1–2 boss HP −6.5%; base HP rose at the same time.
- Coming: the launch leaderboard closed Nov 2, with winners due Nov 9 and mail rewards by Nov 16 (top 10 per server and class: 35,000 Enhance Stones, 30 Unique Amplify Stones and a Philosopher's Stone: Revelation); Season 2 (Dec 16) adds Submerged Life Temple (client data).
Class fit uses AionFlex meter uploads from before the Oct 28 nerf; the damage gaps between dungeons are about 5%, so treat them as a lean, not a rule.
Wings and collection
Worn wings add stats; every pair you own adds a second bonus that grows to +10, even while you wear another. Pairs come in Elyos and Asmodian versions.
| Wings | Grade | Equipped stats | How to get them |
|---|---|---|---|
| Talisra | Unique | Attack +60, Accuracy +35, Cooldown Reduction +4%, Defense +400 | Season shop (about 250,000 season points per one guide; check the in-game price) |
| Abyssal Waves | Unique | Attack +60, Cooldown Reduction +4%, PvE Damage Boost +3.5%, PvE Damage Tolerance +3.5% | Sealed drop from Ludra (about 2.5% per kill, tradable), converted in Substance Morph |
| Nightmare | Unique | Boss Damage Boost +3.5%, Attack +60, Crit +35, Accuracy +35 | Nightmare shop, paid in Phantasmal Fragments |
| Forest Spirit | Unique | Damage Tolerance +2.5%, Defense +400, Boss Attack +95, Boss Damage Boost +3.5% | Drops sealed in Vakron Sky Island (a normal party dungeon, Conquest gate item level 1,400); unseal it by conversion with 10 Radiant Odyle |
| Dark Veil | Unique | Damage Boost +2.5%, Attack +60, Boss Defense +500, Boss Damage Tolerance +3.5% | Ferocious Horn Den (normal party dungeon, item level 2,100), same conversion |
| Kromede | Unique | Attack +60, Crit +35, HP +500, HP Regen +250 | Fire Temple (normal party dungeon, item level 2,100), same conversion |
| Black Fragment | Unique | Crit +35, Crit Attack +95, HP +500, HP Regen +250 | Krao Cave (normal party dungeon, item level 700), same conversion |
| Blue Wave | Unique | Evasion +35, Crit Resist +35, MP +250, MP Regen +90 | Draupnir (normal party dungeon, item level 700), same conversion |
| Ancient Aullaeu | Unique | Attack +60, Defense +400, MP +250, MP Regen +90 | Urugugu Canyon (normal party dungeon, item level 1,400), same conversion |
| Springflower Butterfly | Unique | Penetration +500, Block Penetration +60, Attack +60, Accuracy +35 | Festa (Shugo Festival) shop |
| Conqueror | Epic | Defense +300, Boss Attack +80, Boss Defense +400 | Nightmare shop |
| Brawler and Warrior | Unique and Epic | PvP stats (Status Effect Chance, Defense, HP) | Abyss, arena and battlefield shops |
| Sealing and Glorious | Epic | Healing and MP stats (Glorious: MP Cost Reduction +3%) | Sealed dungeons: 70 Sealed Wing Featherdown plus 10 Pure Odyle (Featherdown drops 2 at a time) |
| Radiant Love | Unique | Defense +400, Evasion +35, potion and MP regen | Hidden Cubes |
| Lesser Daeva and Aullaeu | Common and Rare | HP +200; MP +200 | Quests at level 5 and level 30. Owning Lesser Daeva Wings adds +2,000 Flight Power (one source says +2,500 after the Oct 9 patch) |
Ultimate Daeva Wings are free from the level-45 Ascension quest. The six dungeon-drop wings are Unique items from normal party dungeons, gated by your total item level for Conquest (700 for Krao Cave and Draupnir, 1,400 for Urugugu Canyon and Vakron Sky Island, 2,100 for Fire Temple and Ferocious Horn Den). They drop sealed and unseal with Radiant Odyle, and the drop is rare.
Wing ladder. Wear the best pair you own and keep every pair, because owned bonuses stack even while another pair is worn. The Daeva quest levels (22, 32, 45) come from a single guide, so check your quest log.
| Stage | Wings | Equipped | How to get them |
|---|---|---|---|
| Level 5 | Lesser Daeva (Common) | HP +200 | Episode quest (The Power in the Lake or The Being Beneath the Lake) |
| Level 22 | Intermediate Daeva (Rare) | Defense +200, HP +300 | Quest "The One Who Hears the Voice" |
| Level 30 | Aullaeu (Rare) | MP +200, MP Regen +50 | Quest (Secrets Within Secrets or Canyon's Secret) |
| Level 32 | Superior Daeva (Epic) | Accuracy +25, HP +400, MP +200 | Quest "The One Who Dreams" |
| Level 45 | Ultimate Daeva (Unique) | Crit +35, HP +500, MP +250, Penetration +500 | Free Ascension quest "The One Who Witnesses the Nightmare" |
| Festa shop | Violet Butterfly (Rare) | Attack +40, Defense +200 | Festa shop (level and price not listed) |
| Item level 700 | Black Fragment (Krao Cave) or Blue Wave (Draupnir), Unique | Crit Attack +95; or Evasion and Crit Resist | Normal party dungeon: sealed drop, unseal with 10 Radiant Odyle |
| Item level 1,400 | Forest Spirit (Vakron Sky Island) or Ancient Aullaeu (Urugugu Canyon), Unique | Boss Attack and Boss Damage Boost; or Attack +60 and Defense +400 | Same; Forest Spirit drops about 0.75% |
| Item level 2,100 | Kromede (Fire Temple) or Dark Veil (Ferocious Horn Den), Unique | Attack +60 and Crit; or Damage Boost and Boss Damage Tolerance | Same; Kromede drops about 1.25% |
| Bosses | Conqueror (Epic) | Boss Attack +80, Defense +300, Boss Defense +400 | Nightmare shop |
| End game | Talisra, then Nightmare; Abyssal Waves from Ludra (Unique) | Cooldown Reduction +4% and Attack +60; Boss Damage Boost +3.5% | Season shop (closes Dec 16); Nightmare shop; Ludra (sealed drop) |
The item levels are your total, not a piece's, and match the Conquest gates under "After 45".
Which to wear (Cleric). On global (metabot, 1,685 Clerics, Nov 7) Ultimate Daeva leads at 32%, then Dark Veil 19% and Talisra 10%; questlog end stages use Talisra in 4 of 8. Plan: Ultimate Daeva at 45 (free), Forest Spirit once your total item level reaches 1,400 (Vakron Sky Island), then Talisra, then Abyssal Waves from Ludra. Glorious Wings cut MP costs if mana is your limit. Collect the rest as you go, because the owned bonuses stack.
Upgrading. Rare and Epic always succeed to +10. Unique is safe to +3, then 90, 80, 50, 50, 50, 40 and 30% to +10 (about 16.7M Kinah, 137 Sync Stones and 66,000 Enhance Stones). Enhancing never changes worn stats, and Unique wings gain only Flight Power from it; each failure adds +10% to the next try. Collect pairs before enhancing, and enhance only the Epic and Rare pairs whose owned stat grows (for example Spirit Wings' PvE Defense).
Titles. You have three equip slots, one each for Attack, Defense and Other, and a title only fits its own slot. Every title you own also adds a collection bonus (check your Title tab). Fill each slot with the best title you own and swap up as you progress:
| Slot | Stage | Title | Equipped | How to get it |
|---|---|---|---|---|
| Attack | Leveling | Teleportation Specialist (Epic) | PvE Damage Boost +3.1%, PvE Accuracy +58 | Activate every Kibelisk in Verteron (Altgard: Altgard Binding Veteran) |
| Attack | Leveling | Nice to Meet You (Rare) | PvE Damage Boost +2.9% | Use the Spacetime Rift 50 times (Verteron's, on the Elyos side) |
| Attack | Leveling | Guardian of Verteron or Altgard (Epic) | PvE Damage Boost +3%, Penetration +210 | Reach level 20 of your home Monolith |
| Attack | Bosses | Verteron Seal Breaker (Rare) | Boss Damage Boost +2.7% | Clear 30 sealed dungeons in Verteron |
| Attack | End game | Scenery Collector (Epic) | PvE Damage Boost +3.3%, Block Penetration +54 | Collect 7 Unique Shugo Festival Artwork |
| Attack | End game | Unbound by Genus (Unique) | PvE Damage Boost +4.5%, Attack +34, Crit +68 | "Genus Genius" achievement: every Genus Insight at level 10 |
| Attack | Crit builds | Golden Glow (Unique) | Crit Attack +45, Crit Damage Boost +3%, Accuracy +60 | Tailor-Made achievement |
| Attack | End game | Genuine Masterpiece | Crit Damage Boost +3%, Perfect +2.5% | Collect 13 Unique boss artworks |
| Defense | Leveling | Hello There | PvE Damage Tolerance +1.9% | Use the Spacetime Rift 3 times |
| Defense | Leveling | Ferocious Horn Den Sightseer | PvE Damage Tolerance +2.6% | First Exploration clear of Ferocious Horn Den |
| Defense | Level 30 Monolith | Saint of Verteron or Altgard | Defense +300, Damage Tolerance +3%, Block +100 | Raise your home Monolith to level 30 |
| Defense | Late | Dominator of Dimensions | PvE Damage Tolerance +4.5%, Defense +340, HP +1,000 | Own 25 wings |
| Defense | End game | Hero's Footsteps | Damage Tolerance +4%, PvE Defense +570, HP +1,000 | Collect 6 Heroic Expedition artworks |
| Defense | End game | Click | Damage Tolerance +3.5%, HP +1,000 | Collect 10 Shugo Festival artworks |
| Defense | Optional | Rule All Creation | Boss Damage Tolerance +4%, Defense +320, Back Attack Tolerance +3% | Collect 200 pet types |
| Other | Leveling | Through Hell and Back | Cooldown Reduction +3%, HP +900 | Clear the sealed dungeon Ruins of the Ancient City of Roah |
| Other | End game | Empty Closet (Unique) | Combat Speed +3.5%, Cooldown Reduction +3.5% | Skin-collecting achievement (over 700) |
| Other | End game | Journey's Path | Combat Speed +3%, HP +900 | Collect 6 Unique Expedition artworks |
Asmodian counterparts (Guardian of Altgard and others) have the same stats; I only checked the Elyos quest names. The guide I read doesn't state the slot for Hello There or the Sightseer title; I placed them in Defense by their stats. Some titles also pay just for owning them: Unbound by Genus, Dominator of Dimensions and Hero's Footsteps each add +1% PvE Damage Boost or Tolerance.
Pets and Genus Insight
Genus Insight rerolls pet stats; Owned Effects grow with how many pets you own. No pet is mandatory.
- Pet: pick a Fera pet (Fossa, Armadon or Tog) from the level 10 quest; only Fera adds ground mount speed. Five souls unlock a pet; level 2 takes 25 more and level 3 (the cap) 75 more, about 105 per pet. Each pet adds 500/250/250 Insight EXP (failed rolls add EXP too), and Genus Insight is shared by every character on the server.
- Stat priority: Double Chance (on global it rolls only in the Special board's slot 4; the 'levels 3 and 9' advice is Korean or Taiwanese data), Attack Bonus, Accuracy, HP, Crit, PvE Damage Tolerance.
- Slot 4: Cogni = Damage Boost (most questlog builds; PvE Damage Boost also works), Fera = Weapon Damage Boost, Natura = PvE Damage Boost (Perfect Chance or Multi-hit as fallbacks), Varian = Front or Back Attack Damage Boost, Special = Double Chance.
- Other slots: 1 and 5 Max Attack; 2 and 8 HP; 3, 6 and 9 Accuracy; 7 Damage Tolerance or Endurance.
- Rolling: each roll costs 4 Soul Crystals and 1,000 Kinah; at Insight 10 a roll is Heroic 5% and Unique 15%, so a Heroic Double Chance is about 0.4% per roll. Level all five boards to 9–10 on unlocked rolls, roll Special first with rainbow crystals, and lock only slot 4 (and 7 for tanks); each lock raises the cost.
- Soul Crystals: Substance Morph (1 per 500 Kinah, 1,000 a week), the Festival shop (100 per 50 tokens, 30 a month), pet milestones (100 every 10 pets), Hidden Cubes, the Odylium Repository and the Ludra check-in (3,000). Pet souls drop in Expedition and Transcendence dungeons since Nov 4.
Empyrean Lord stats and Pantheon
For the Cleric: Time, Destruction (it also powers heals), Illusion, Life, then Death or Freedom; Wisdom only if you run out of MP. Each point adds 0.1% to both of its stat's effects on global (Korea doubled it to 0.2%, and some sites show the Korean rate). You can't spend or reset these points: they come from items, and almost all of the difference between players comes from which version of each Arcana card you run.
| Stat (Empyrean Lord) | +0.1% per point to | Arcana card that gives it | Cleric priority |
|---|---|---|---|
| Justice (Nezekan) | Defense, Perfect Chance | Bell of Vigor | skip |
| Freedom (Vaizel) | Accuracy, Evasion | Compass of Vigor | 5 |
| Illusion (Kaisinel) | Cooldown reduction, Endurance Penetration | Mirror of Vigor | 3 |
| Life (Yustiel) | Max HP, Regeneration | Parchment of Vigor | 4 |
| Time (Siel) | Combat Speed, Double Resist | Chalice of Vigor | 1 |
| Destruction (Zikel) | Attack, Perfect Resist | Bell of Magic | 2 |
| Death (Triniel) | Crit, Regeneration Penetration | Compass of Magic | 5 |
| Wisdom (Lumiel) | MP cost reduction, Double Chance | Mirror of Magic | only if MP-starved |
| Destiny (Marchutan) | Max MP, Endurance | Parchment of Magic | skip |
| Space (Israphel) | Move Speed, Block | Chalice of Magic | skip |
- Arcana is the real choice. Each slot has a Vigor and a Magic version with a fixed stat (+20 at Unique, +1 per card level, so +25 at +5). Skill lines belong to the slot, not the version, so the version only changes the stat and the set bonus. Top Clerics run Chalice of Vigor (96% of top Clerics), Parchment of Vigor (68%), Bell of Magic (84%), Mirror of Vigor (68%); the Compass splits 52% Magic to 48% Vigor (questlog Clerics: 4 Vigor, 4 Magic). Only 32% run Mirror of Magic (Wisdom).
- Sets: most top players run three Vigor and two Magic cards for both 2-piece bonuses (Primal Vigor +60 PvE Attack at 70% HP or more; Magic Armor restores 1,500 MP at 20% MP or less); only 32 of 144 run four Vigor cards.
- Colossus: take the Justice, Time and Destruction one: Zikel's Apparition (14,000 Phantasmal Fragments, +45 each; 140 of 144 top players run it), or Guardian Lord Nahma (+55 each) if you get the drop.
- Statues and artworks add only +4 to +10 each (the Pantheon holds 1 colossus, 4 statues and 12 artworks; you swap pieces, you can't enhance them), so buy them last; every questlog endgame build runs Statue: Transcendent Bakarma (Death, Space and Freedom +12; kill Bakarma 10 times in Conquest), then Asahr's Mirror (22 of 24 questlog builds) and Artifact of Eternity (20), then Statue: Kibelisk (10) or Fortress Guardian Notun (9); Artwork: Abyssal Ludra (a Ludra drop) appears in 5. Freedom statues: Gerod (8,000 fragments, +10), Wraith Giselle (5,000), or all 61 home teleports for Statue: Kibelisk (+10).
- Bracelets: Ascension and quest bracelets have fixed lines, but the Abyssal Bracelet (from Ludra; item 70 in questlog's global table, 86 per GameWith) rolls four Empyrean Lord stats at 9–17 each (up to +68), so look for Time and Destruction lines; 19 of 44 questlog characters wear two in some stage, and the common lines are Time, Destruction, Wisdom and Illusion.
- Currency: Phantasmal Fragments, mostly from Nightmare (up to 1,500 a run, and Instant Clear Tickets cost 30,000 Kinah since Oct 28). They can't be traded and carry over between seasons.
- Spend order: Stigma Shards and Daevanion Crystals first (Nightmare Trade Shop: 300 fragments per crystal, 50 per character; 52,500 for 35 shards), then the colossus, then statues and artworks, then wings and cosmetics.
Class orders come from 144 top EU and NA characters (23–25 per class, 196K–288K Combat Power) read from the official armory on Oct 28.
Build variants
| Variant | Skills | Stigmas | Stats |
|---|---|---|---|
| Boss healer (this guide) | Condemnation, Radiant Recovery, Healing Light, Light of Regeneration, Chain of Torment | Light of Protection, Earth Punishment, Noble Aura, Prayer of Amplification | Accuracy, Attack, Cooldown Reduction, Combat Speed |
| Solo and AoE | Condemnation, Judgment Thunder, Divine Aura (AoE), Bolt, Chain of Torment | Same | Accuracy, Attack, Combat Speed, Damage Boost |
| Defensive PvE | Healing Light, Radiant Recovery, Light of Regeneration | Light of Protection, Absolution, Yustiel's Power, Summon Resurrection | Attack, HP, Damage Tolerance, MP |
| With a Chanter | Same | Absolution instead of Light of Protection | Same |
| Arena | Healing, Defiance, Root, debuffs | Salvation, Yustiel's Power, Absolution | HP, PvP Tolerance, PvP Accuracy |
Party play
When a Chanter is in the group, the higher level wins and ties go to the Chanter's mantra, except Power of the Storm: its party buff can't be received while Earth's Blessing is active (client tooltip).
| Cleric | Overlaps with Chanter's |
|---|---|
| Light of Protection | Undefeated Mantra |
| Earth's Blessing (Earth Punishment) | Power of the Storm |
| Chain of Torment | Earth's Promise |
| Debilitating Mark | Wave Blow debuff |
Swap Light of Protection for Absolution or Benevolence; in 5-player expeditions and 10-player sanctuaries, don't stack both mantras. Your contribution is the Earth Punishment blessing, Chain of Torment's tolerance debuff, Debilitating Mark's damage cut, Prayer of Amplification and the heals.
Events and what to prioritize
Almost everything in AION 2 refills on a timer and wastes anything past its cap, so the rule is: spend whatever is closest to its cap first. Daily and weekly counters reset at 16:00 server time (weekly on Wednesday).
Shugo Festival (hourly)
A rotating minigame that opens every hour (a Shugo icon and countdown appear beside the minimap; trust the in-game timer, since published schedules disagree). Entering is free; you pay one Reward Key per reward pick after you finish. A better placement gives more picks, but every pick still costs one key, and confirming a pick is final.
- Keys: 3 per day, cap 12 (21 with membership), shared by every character on your server. Keys over the cap are lost. Sources disagree on exact numbers, so check your in-game counter. Hidden Cube and Dimensional Invasion keys cannot be used here.
- Rewards at level 45: the participation package gives 50 Centuryroot Tokens and 700 Enhance Stones; the key package adds 1,200 Enhance Stones, three Soul Codex (bound), 800 Abyss Points and extra rolls, with a chance at unique gear. Reward pools are Chaos gear, Shade gear, Odyle, Refining Stones and Abyss Points.
- Token milestones: each of the nine games pays 20, 40 and 85 tokens at three participation milestones (1,305 tokens for all of them), and the general Festival track pays 30 tokens plus 10 Soul Crystals at 3 participations and 40 plus 10 at 10.
| Minigame | Goal | Players | Time |
|---|---|---|---|
| Jump Jump | Dodge lasers, collect balloons | 1–4 | 2:55 |
| Not This Tile? | Memorize safe tiles over 8 rounds | 1–6 | 3:15 |
| Hidden Lugi | Hunt disguised Lugis, or gather Odyle drops as one | 2–9 | 3:30 |
| Odyle Flight Frenzy | Fly a canyon route collecting drops | 1–8 | 3:30 |
| Goldrin's Treasure | Open chests marked by light columns | 1–8 | 3:50 |
| Wraith Evasion | Collect drops while avoiding wraiths | 1–6 | 5:00 |
| Mysterious Track | Mount race with boosts | 1–8 | 5:00 |
| Defend Shugo Merchants | Hold off enemy waves | 1–8 | 5:00 |
| Up! Up! Up! | Climb moving platforms (clear checkpoint 1 to qualify for rewards) | 1–8 | 5:00 |
What a PvE Cleric should buy with Centuryroot Tokens (in this order):
- Daevanion Crystals (bound): 50 tokens each for the first 10, then 100, 200 and 400 (all 50 cost 10,500). More board points is the strongest upgrade for this build.
- Wisdom Stones (bound): 350 tokens in an event Festival shop per one guide; metabot's global shop data lists none in the Centuryroot Festival shop, so check in-game before saving tokens for them. Each stone is worth one skill point, which only helps until your key skills reach rank 10 (see How skills level up).
- Stigma Shards (bound): 300 tokens each, up to 35 per character, for Earth Punishment and Prayer of Amplification to 20 and Light of Protection to 10.
- Soul Crystal packs: 50 tokens each for ×100, up to 30 per month per character.
- Cosmetics (wings, pets, skins) last. Wings cost 2,100 to 8,350 tokens.
Korea's Oct 7 patch also merged the per-mode Shugo remnants into one "Masterpiece" remnant that converts through Material Conversion, and added Stigma Shards to the Abyss, Nightmare and Festival shops; global already sells them (Abyss shop 200 per character, Nightmare 35 at 1,500 fragments each, Festival 35 at 300 tokens each). Don't interrupt leveling for every hourly round; start farming it at level 45.
Daily and weekly priority order
| Counter | Refill and cap | Why it matters |
|---|---|---|
| Odyle Energy | +15 every 3 hours; cap 560 (840 with membership). The shop adds 4 per character and 16 per server a week, and a login event mails 4 a day until Nov 10 | Spend on Conquest first for gear, leftovers on Transcendence. The most important resource not to waste |
| Duty Missions | 5 per day, shared by the server | Each pays 50,000 bound Kinah and 1,000 Abyss Points; pick missions that pay Odyle or Enhance Stones |
| Nightmare | 2 per day, cap 14 (only a clear spends one) | Phantasmal Fragments for Pantheon |
| Conquest | 1 reward count per 8 hours, cap 21 | Unique gear; cubes cost about 40 Odyle |
| Transcendence | Reward count 1 per 12 hours, cap 14 (entry is free; each cube costs 40 Odyle); gates 1,600 to 2,500 | Arcana |
| Shugo Festival keys | 3 per day, cap 12 | See above |
| Dimensional Invasion | 1 key per day, cap 7 | Bankable; low urgency |
| Odyle cube counter (one guide; unverified) | 10 per server per week | Clearing without taking the cube still lowers it; at 0 you can't enter Conquest or Transcendence until reset |
| Weekly (reset Wednesday) | Raids (4 attempts; Abyssal Forge: Ludra runs last up to 1 hour), Ascension Trial ×3, Subjugation ×3, Exploration ×7 per dungeon, Unknown Fissure ×14, Abyss time (stores up to 7 hours since Oct 14; two weekly Season Missions give Abyss Entry Stones) | Spend non-banking weekly entries first after reset; finish before Tuesday's cutoff |
Limited-time events right now (as of Nov 4)
| Event | Dates | What you get |
|---|---|---|
| Odyle Energy Boost | Oct 28 – Nov 10 (PST) | 4 Odyle Energy a day per account by mail (mail expires after 7 days), about 28 extra claims a week |
| Halloween Twitch Drops | Ended Nov 3; claim by Nov 17 | 1 hour: Resurrection Spiritstone ×15. 2 hours: Appearance Change Voucher. 4 hours: Customization Voucher ×3. 6 hours: Odyle Energy ×4. 8 hours: Chubby Panda helm |
| Trick or Treat (Halloween) | Ended Nov 3 (the chest and tickets last until Dec 15) | Pumpkin Coins from attendance (35 a day, 100 on days 7 and 14) and Season Missions; the Coin Merchant sells a Special Halloween Chest (250, 1 per server), Odyle Energy (10, 4 per server a week), Lower Abyss Rift Stones (30, 2 a week) and Shugo Festival keys (7, 3 per server a week). Coins and candy are deleted Nov 3; the chest and tickets on Dec 15 |
| Transcendence Dungeon Leaderboard | Ended Nov 2; winners Nov 9 | Per server and class; the top 10 get 35,000 Enhance Stones, 30 Unique Amplify Stones and a Philosopher's Stone: Revelation |
| Guides for Glory (no current source names it; check the event page) | Ended Nov 2 | Original guide submissions; up to 10 winners get 4,000 Quna and the Tutor of Atreia title |
| Atreia's Call (28-day attendance) | Oct 28 until the Dec 2 maintenance | Odyle Energy ×2 on days 7, 14, 21 and 28, plus Battle Enhance Scrolls, Soul Crystals, Soul Codex: Reset and Content Usage Ticket Selection Chests |
| Daeva Pass: Prelude to Flight | Oct 28 – Dec 2 | Free track: Small Odyle Energy, Battle Enhance Scrolls and tickets; premium (1,000 Quna) pays full Odyle Energy. 300 pass EXP per Expedition or Transcendence clear, 15,000 a week |
| Wind Breeze Merchants (since Oct 28) | Ongoing | Odyle Energy: 4 per character and 16 per server a week. Instant Clear Tickets for Nightmare and the Daily Dungeon: 14 per server a week at 30,000 Kinah each |
| Rise to the Challenge: Resurrection Spiritstone (Season 1) | Oct 21 until the Dec 15 PDT (Dec 16 CEST) maintenance | Shop → Wind Breeze Merchants: 30 for 25,000 Kinah, then 30 more for 50,000 Kinah, per server per week (Korea's version was Resurrection Flare) |
| Abyssal Forge: Ludra (open, 1-hour runs) | Nov 4 | Normal at 2,800 item level, Hard at 3,000 |
| Ludra Conquest Check-In | Nov 4 – Nov 17 (PST) | 7 login rewards over 14 days: 1.5M bound Kinah in total, 2,000 Centuryroot Tokens, 3,000 Phantasmal Fragments, 30,000 Abyss Points, 3,000 Soul Crystals and a Fresh Leaf Tiara |
| Ludra Twitch Drops | Nov 4 – Nov 17 (PST) | 1–14 hours of watching: Odyle Energy ×6 at 9 hours, a Content Usage Ticket Selection Chest at 10, 2 Rare Theostone Chests at 13, plus cosmetics |
| Ludra Hunt | Nov 4 – Nov 24 | Titles for the first 20 Hard clears per region (The First to Slay Ludra, Ludra's Conqueror, Ludra's Vanquisher); Ludra's Nemesis for anyone who clears |
| Daeva Bootcamp | Nov 4 – Nov 17 | Global Conquest and Transcendence clear milestones mail Instant Clear Tickets, Intermediate Training Arcana and Resurrection Stones |
| Server transfers | Resumed after a pause (Oct 26 notice) | Free, one per account, same faction and region; now level 45 and up |
| Launch login rewards | Log in before Dec 1 | Pre-registration and wishlist rewards arrive by mail (collect by Dec 8) |
| Global Launch Twitch Drops | Ended | 1 hour: Odyle Energy ×4. 3 hours: Enhance Stones ×5,000. 8 hours: Resurrection Spiritstone ×10. 10 hours: Adorable Young Elim shoulder cosmetic |
Common mistakes
- Playing as a heal bot; rewards depend on damage.
- Leveling heals before attack skills.
- Using Condemnation without Chain of Torment on the target.
- Ignoring Earth Punishment.
- Keeping Light of Protection on beside an equal or stronger Undefeated Mantra, or macroing it.
- Automating emergency skills or Bolt's release.
- Healing after the damage instead of before it, or using every heal at once.
- Ignoring Attack; heals scale with it.
- Ignoring MP on long fights.
- Weapon past +10 before the cap, or expensive manastones on temporary gear.
- Spreading Daevanion points instead of taking the +1 skill nodes.
- Locking weak Genus Insight rolls early.
- Letting Shugo keys or Odyle Energy sit at their cap. The weekly Odyle cube counter (10) also drops when you clear without taking the cube; at 0 you can't enter Conquest or Transcendence until reset.
- Mouse macros or third-party tools.
Community builds (questlog)
The most-liked global PvE builds on questlog.gg's skill builder and character builder (checked Oct 31, rechecked Nov 7) mostly match this guide. Likes are small and many endgame stages are wish lists, so read them as community opinion beside the armory data above.
| Build | Author | Type | Likes |
|---|---|---|---|
| MrRosaPony PVE&PVP Ultimate Cleric Guide | mrrosapony | Gear | 996 |
| Skill Set Cleric PVE MrRosaPony | mrrosapony | Skills | 162 |
| Cleric DPS | whelps | Skills | 38 |
| Ruthless | th3ruthless | Gear | 112 |
| [Alwera Heal-Dps [F2P]](https://questlog.gg/aion-2/en/character-builder/InfernalSealPillageProvidence) | marx0310 | Gear | 89 |
Where they differ from this guide:
- Stigmas: Earth Punishment 20 first, then Prayer of Amplification, Light of Protection and Noble Aura; endgame builds run all four at 20.
- Swaps: with a Chanter, top builds swap Light of Protection for Summon Resurrection or Yustiel's Power; for Ludra, Summon Resurrection replaces Noble Aura; Absolution when healing is short.
- Ranks: Divine Aura 16, then 20; Earth's Retribution 20 at endgame in 3 builds.
- Bolt: skill speed, +20% vs fewer and crit; nobody takes +300 Accuracy. MrRosaPony uses Bolt only for burst windows, since it parses lower than the macro.
- Mana: hold left mouse only while MP is short; late game the macro alone does more damage.
- Gear: ring lines Condemnation and Divine Aura first, then Radiant Recovery, Bolt or Judgment Thunder; Damage Boost Superior stones where you hit them.
- Empyrean (split): MrRosaPony ranks Time, Illusion, Freedom and Life ahead of Destruction.
- Stack setup: Chain of Torment > Condemnation on one key and Prayer of Amplification > Earth Punishment (> Divine Aura, Light of Regeneration, Noble Aura) on another; the macro presses both and heals stay manual. MrRosaPony's: Debilitating Mark, Divine Aura, the Prayer stack, the Chain stack three times, Judgment Thunder.
- Gear by stage: Spiritforged Mace +10 to 2,100 (nobody uses the Aulamus Mace) → Enraged Kromede Warhammer +15 (3 of 5) → crafted Splendent Wise or White Dragon Lord Mace or Ludra's Fatal Mace, Abyssal Bracelets. Wings: Talisra in 4 of 5.
- Titles: Playing God (Attack slot: PvE Damage Boost +5.5%, Accuracy +90, Double Chance +400) appears in some builds, but its condition is unpublished, the client flags it hidden and no global owner is confirmed, so plan around Unbound by Genus. Journey's Path (Other slot: Combat Speed +3%, HP +900) comes from collecting 6 Unique Expedition artworks.
- Gear extras: Philosopher's Stone: Revelation adds a fifth engraving line to Unique gear (2 stones and 1M Kinah, always succeeds; weapon and guard first). Superior stones can also roll Damage Boost, Weapon, Crit Damage, or Front or Back Attack Damage Boost (about 0.5% each, +100 at best); keep any on the weapon and guard, but yellow Attack +10 is the realistic target. Necklace and earrings reroll toward Might, then Precision, after the class passives.
- Chalice crystals: the 5 Mysterious Crystals for a Unique Chalice come from Season Mission > Tower of Trials (3, for 4,000+ points in Hard Ascension Trial), the Season Shop (1, 25,000 coins) and extracting spare cards (1).
Sources
Korean data runs a couple of patches ahead of global; check tooltips after big patches.
- AION2CAL Cleric guide: gear and engravings (9,080 top Korean Clerics)
- AION2CAL Cleric skills and stigmas by level
- AION2CAL Cleric Daevanion route
- AION2CAL class DPS by combat-power bracket
- metabot Cleric class page (global client data)
- metabot Daevanion planner (Cleric boards)
- metabot wings list and mounts, pets and wings guide
- metabot gear progression, Theostone and Manastone guides, and the enhancement calculator
- couga54 Cleric guide
- expcarry Cleric guide
- aion2-meta Cleric build
- metabot leveling guide
- metabot titles, dungeon, stigma, crafting and gear enhancement guides
- metabot daily and weekly checklist
- Official Korean update notes list
- AION2 Hub patch notes: Oct 7, Oct 5 launch, Sep 23, Sep 4 and Aug 12
- aion2.blog Shugo Festival guide
- GameTruth Shugo Festival guide
- Official global Twitch Drops notice
- shugo.gg class tier list (Oct 11)
- aion2game.com launch events
- MeinMMO on the removed Ludra raid and gaminghq.eu
- game8 Genus Insight guide
- game8 Phantasmal Fragments guide
- Sportskeeda Pantheon explained
- mein-mmo macros for all classes
- playnews.gg macro setup
- gamesfuze macro setup guide
- aion2timers stat calculator
- Corpus gear score guide: thresholds and what counts (Oct 10)
- Raid Relay gear score progression 45 to 2,100 (Oct 10)
- metabot dungeon guide: run order, entry limits, Ascension Trial gates (Oct 10)
- metabot content unlocks by item level
- Official notice: Server Transfer Products Info (Oct 9)
- Official Producer's Letter: Welcome to Atreia (Oct 9)
- Official notice: Update on Sanctuary Raid (Ludra)
- Official Oct 14 global update notes (aion2hub transcription) and Korea's Oct 14 notes
- Official Oct 21 global update notes (Expedition Hard, Ariel board)
- Official Oct 28 global update notes (boss nerf, Hard Urugugu and Vakron, crafted Amplify)
- Official notice: Ludra Awakens on November 4th (Odyle Energy Boost, Ludra events) and Halloween Twitch Drops
- metabot Transcendence (client data), wikily Deus Research Base and rewards and Shattered Arkanis
- mobalytics Deus Research Base guide and Shattered Arkanis guide; timesaver Transcendence guide
- AionFlex class presence in clears and class damage by dungeon
- raidrelay gear score, Conquest, Transcendence and Gear Transfer guides; aion2-guides.info progression
- metabot stats (0.1% per point, caps) and Arcana guide; Odealo best Arcana per class
- aion2tool global Combat Power ranking (sample selection; stats read from the official armory), allthings.how Nightmare Trade Shop, aion2hub Colossus: Guardian Lord Nahma and GamesFuze Pantheon guide
- questlog.gg skill builder and character builder community builds (checked Oct 31; most-liked global PvE builds per class)
- Official Nov 4 global update notes (Abyssal Forge: Ludra, Exploration buff, crafting)
- AionFlex boss entry Combat Power (Nov 7)
- metabot class builds (wings, titles, CP medians, Nov 4–7)
- metabot Abyssal Forge: Ludra and Combat Power guide
- mobalytics Rahu and Ketu boss guides; expcarry Ludra guide
- questlog.gg skill and character builds, rechecked Nov 7
- Official announcements mirrored on Steam (events, transfer limits)
- allthings.how: Noble Belt and Revelation Amulet upgrades, Daevanion Crystal sources and Clash Runes
- GameTruth belt and amulet guide, Fextralife Clash Rune odds and daevaguides Krao Cave loot
- senseos.gg grade names and Amplify and Selphie: raising gear score (Oct 12)
- wikily.gg Essence Extraction skills and proficiency and Odyle specialty skills (the other node types share the tree)
- VGC Essence Extraction guide, playnews.gg Essence Extraction and selphie1999gaming Splendent Ruby quest